移动端开发基础
暂停更新
基于本笔记偏向于实战,难以用笔记的形式详细的叙述知识点,因此暂停更新 by 2024-10-26
1.1 安装软件
1.1.1 开发工具:HbuilderX和微信开发者工具
HbuilderX编写uniapp代码和MD文档的IDE(主要战场),代码可以编译为H5,小程序、APP等。
微信开发者工具官方的开发工具,通常代码不在这里写,HbuilderX编译小程序代码需要在该环境下运行。
1.1.2 分布式版本控制系统 Git
Git是目前世界上最先进的分布式版本控制系统(没有之一)。
开发团队用来进行项目协作的利器,管理本地仓库以及与远程仓库沟通。
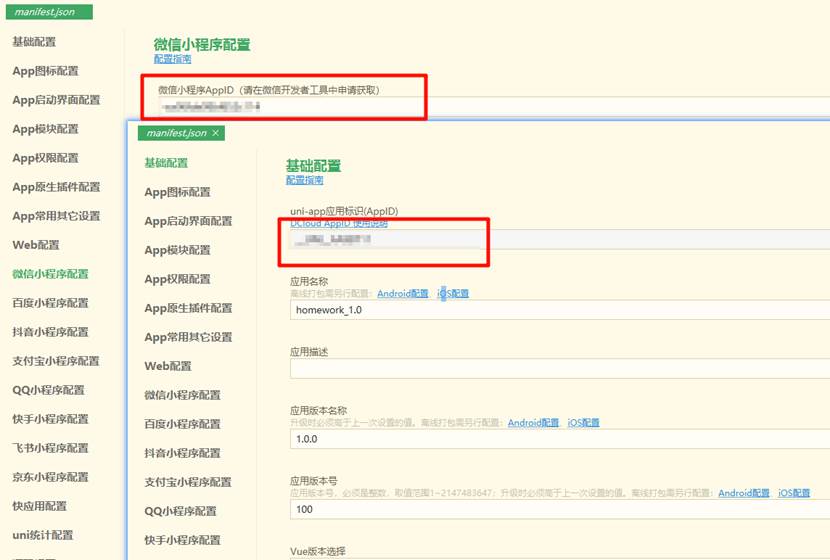
1.2 微信小程序注册
- 微信小程序不同于其他网络服务程序,其运行载体和平台是微信。
- 不同开发者的作品都要聚集到这一亩三分地。如果只在本地实验,调试运行,则无需注册。
- 如果要将完成的作品放到微信平台上,就必须进行注册,拥有独一无二的可区别的身份和标识。
注册小程序账号的时间通常不会很长,基本上只需要几分钟时间就可以完成。具体的流程可参考:小程序注册流程
登录成功后,获取自己的小程序唯一标识符(AppID)。
<·>槽点
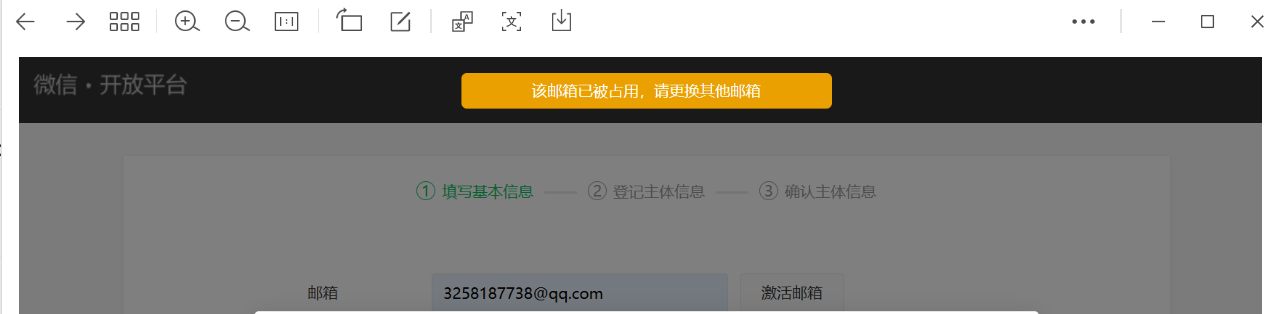
微信开放平台注册真的是ex,注册需要的邮箱是否已经=>
1)已绑定开放平台的邮箱;
2)已绑定个人微信的邮箱;
3)已绑定企业号的邮箱;
4)已绑定订阅号、服务号的邮箱;
5)已绑定小程序的邮箱。
注:同一个邮箱只能绑定微信产品的一种帐号,可以尝试解绑或修改绑定的邮箱后再用于注册。
而,订阅号、服务号、小程序等 属于开放平台下
我上早八
属于是儿子不认爹
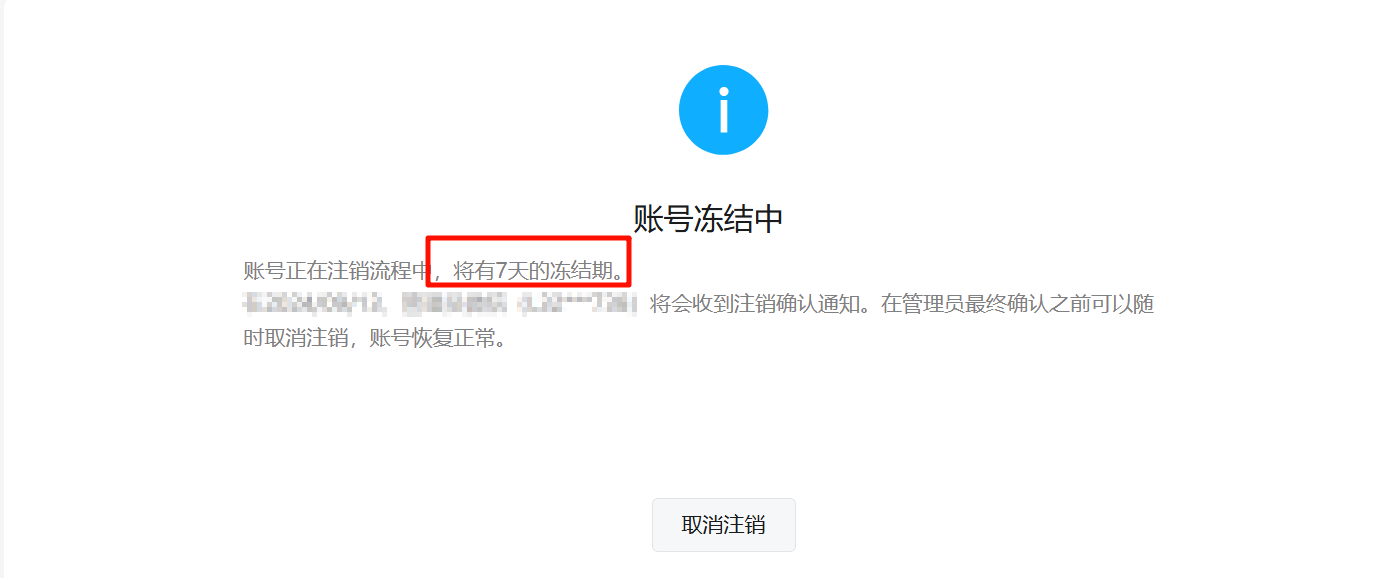
并且在注销的时候还要七天的“冷静期”
1.3 运行你的第一个微信小程序
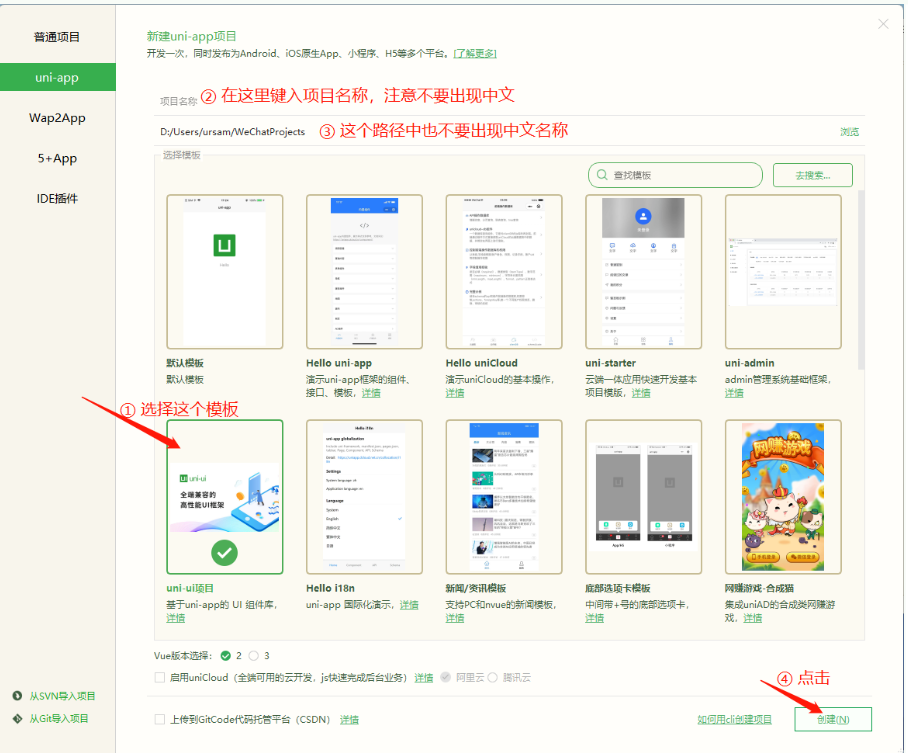
1.3.1新建 uni-ui 项目
启动HbuilderX,选择新建→项目,并参考下图操作。 项目名称:uniapp_1
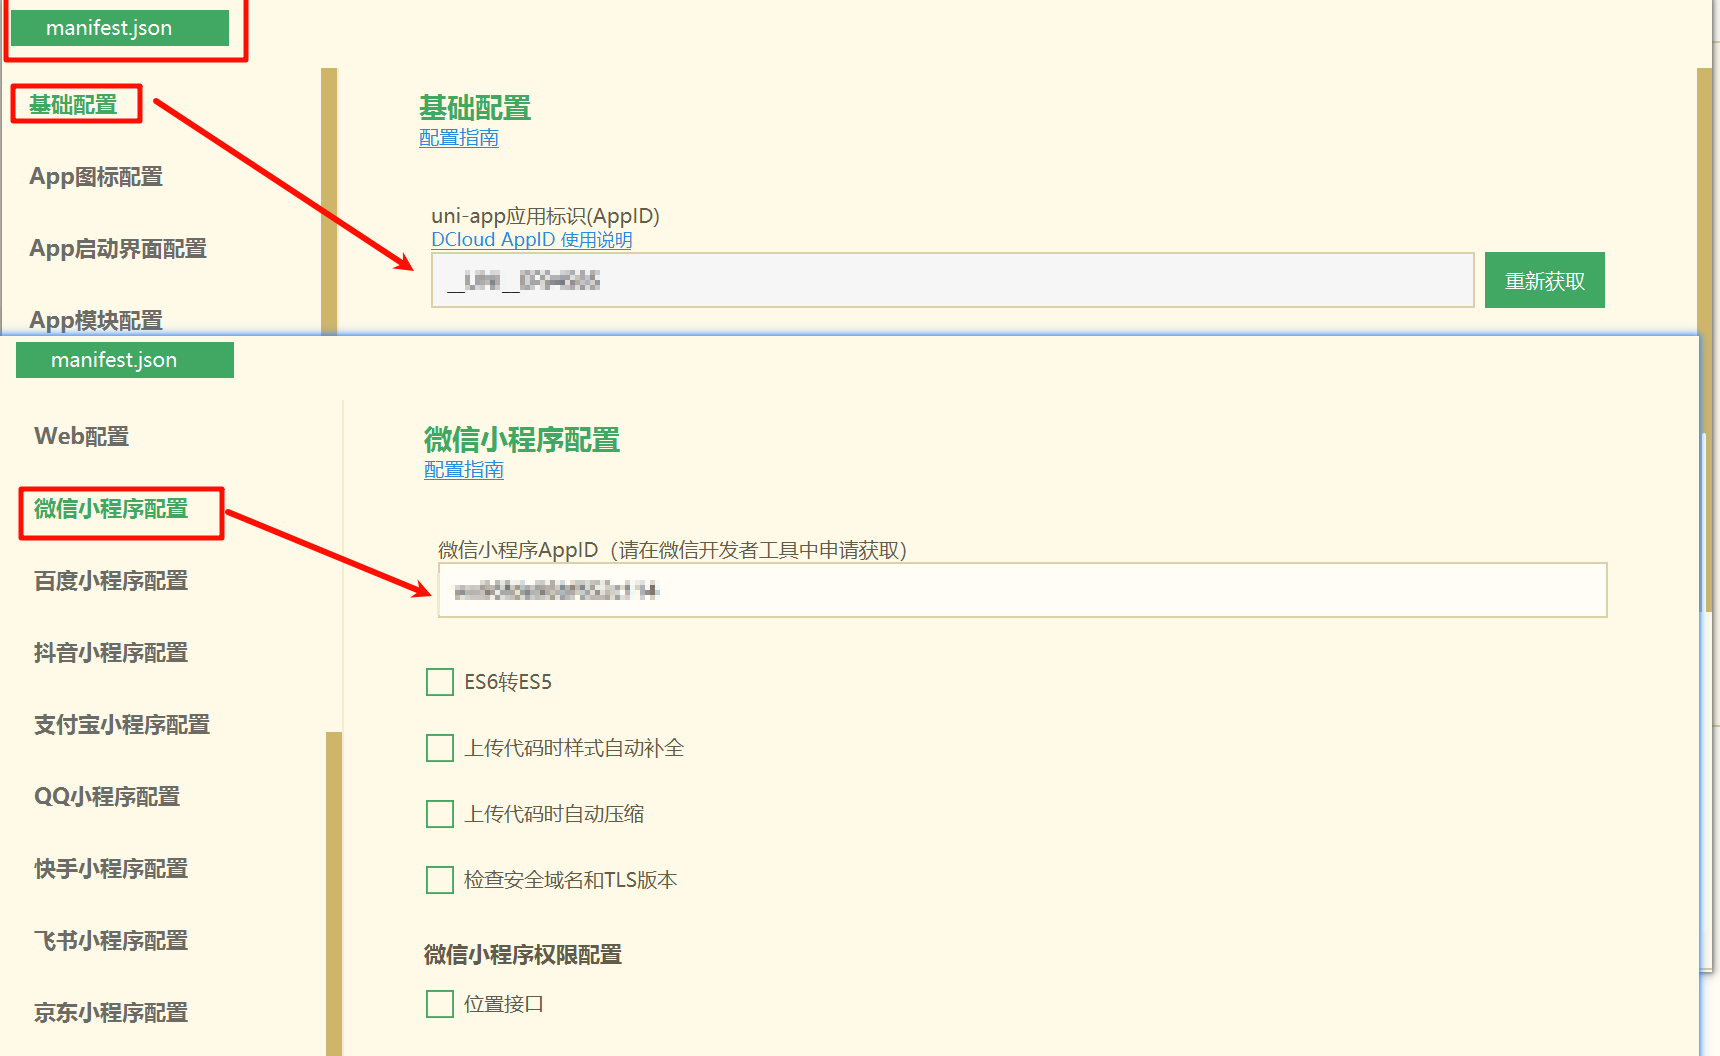
1.3.2对项目进行配置
1.3.3 运行环境配置
不配置也会自动找到运行
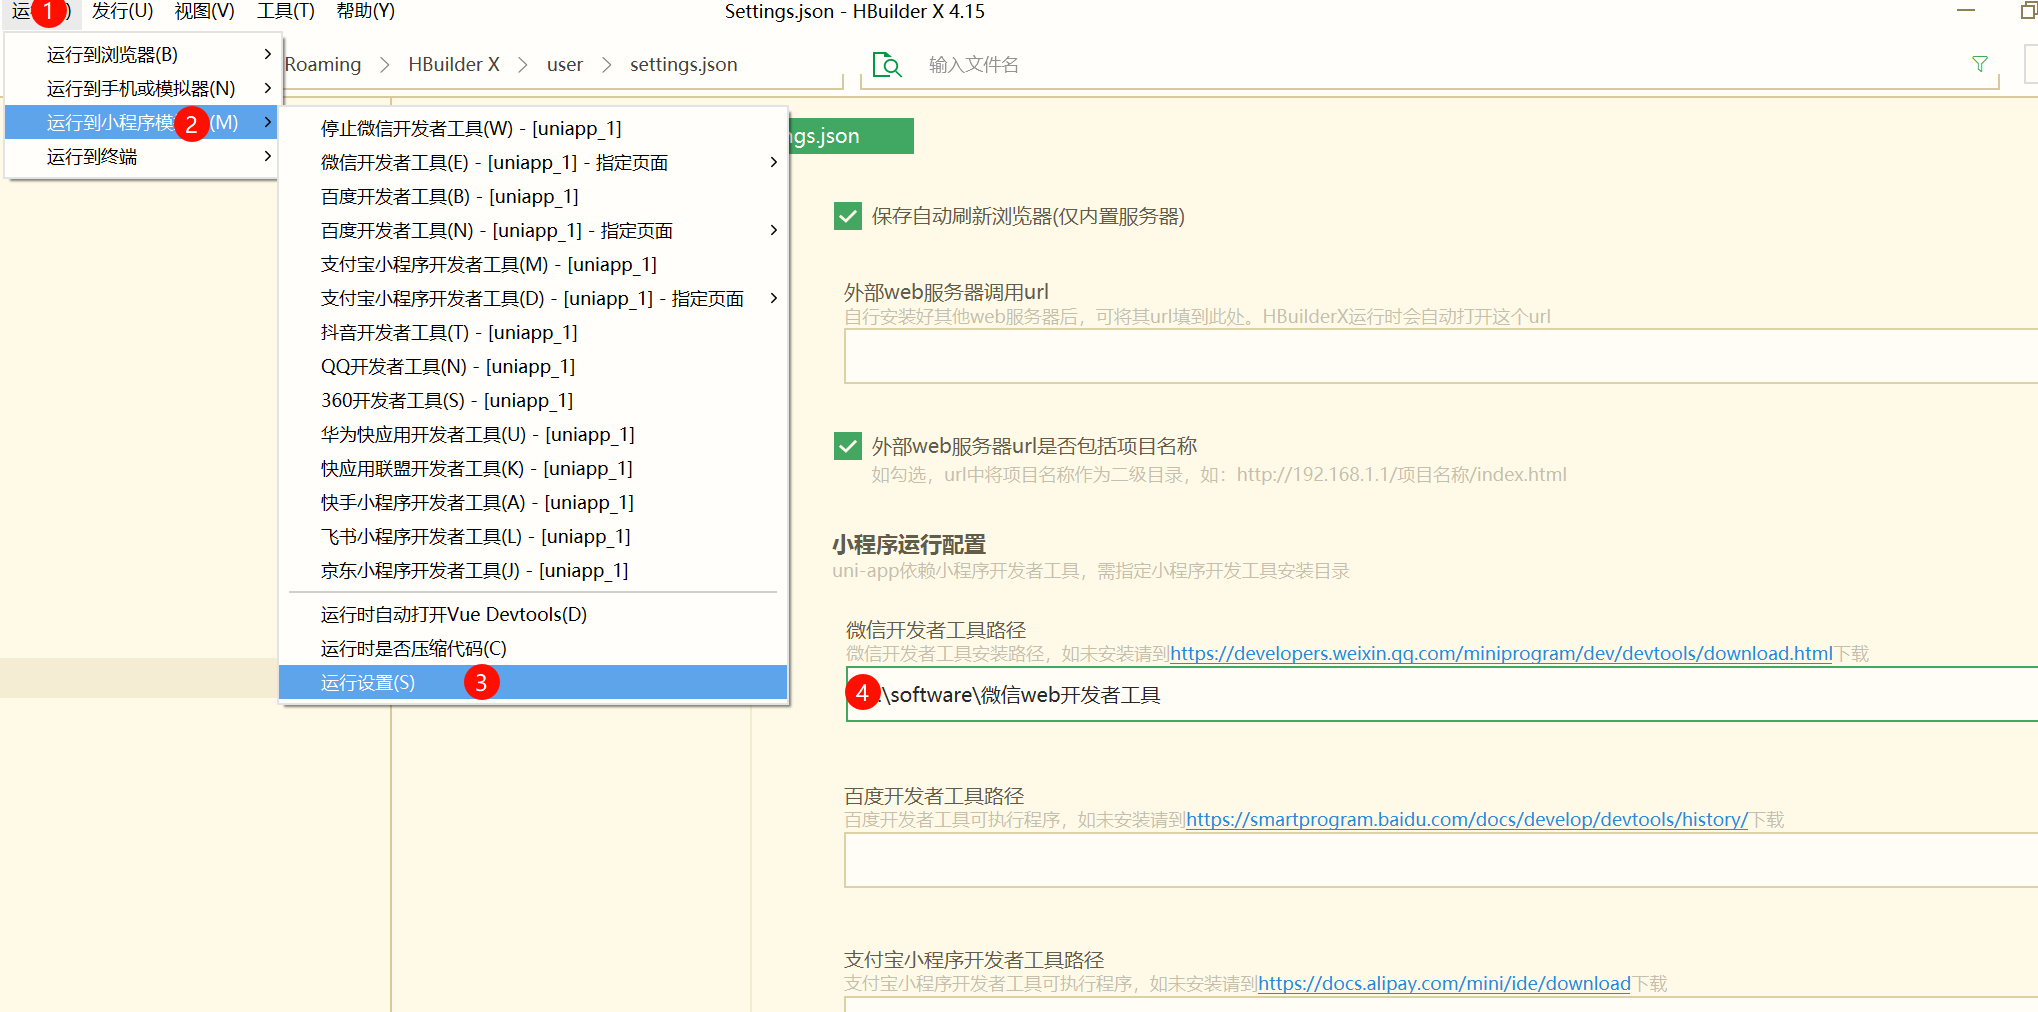
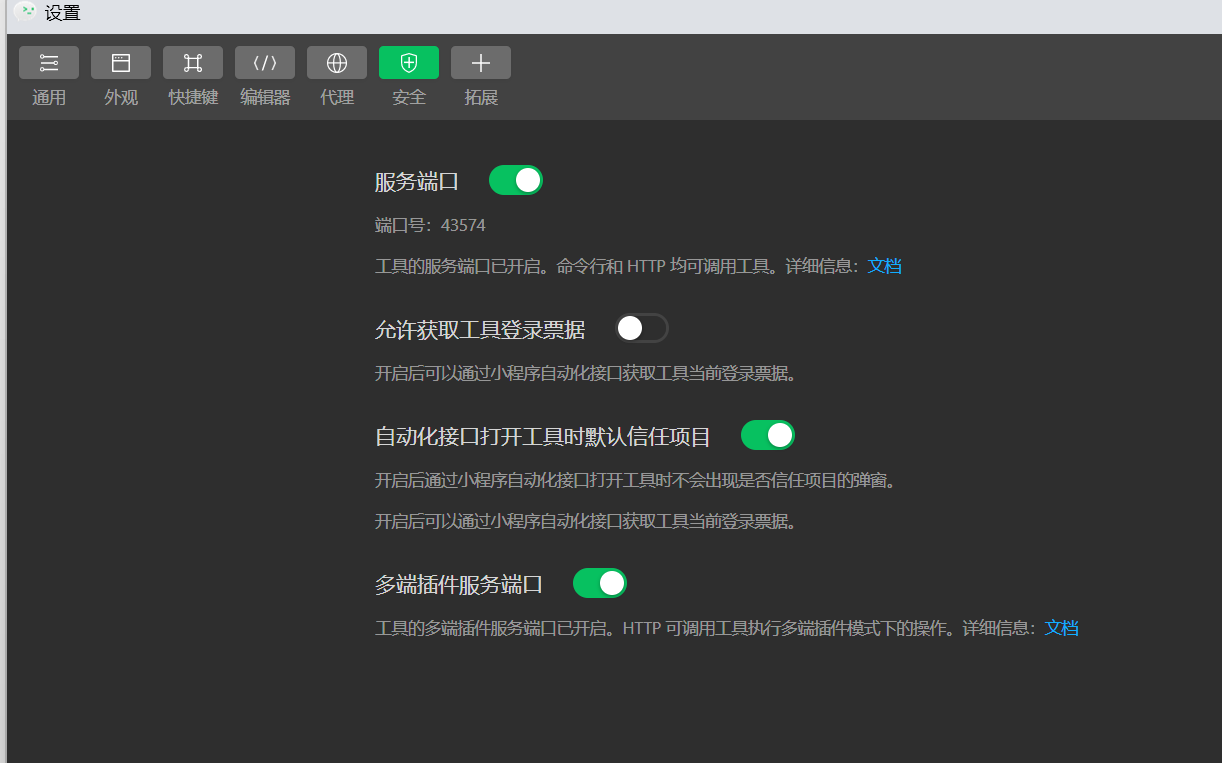
1.3.4 配置微信开发者工具
打开服务端口
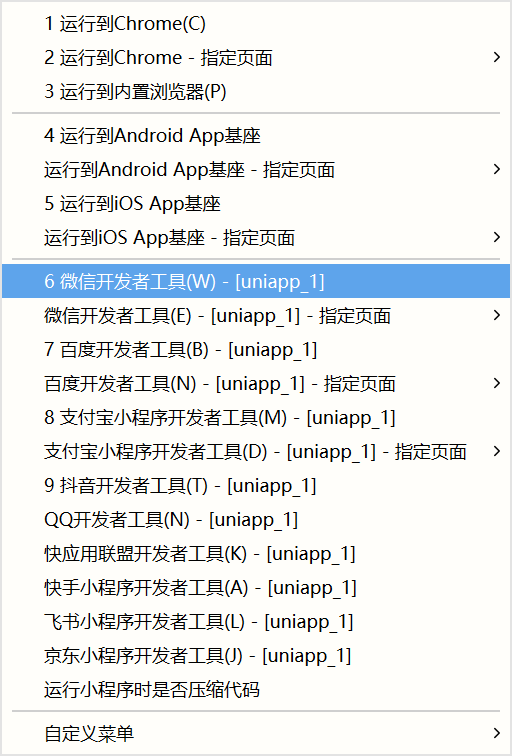
1.3.5 在微信小程序模拟器中运行
1.3.6 hello页面
<template>
	<view class="nameWord">

		<h1>i am lihuibear ,你好 {{name}}</h1>

	</view>
</template>

<script>
	export default {
		data() {
			return {
				name:"石家庄学院"
			};
		}
	}
</script>

<style lang="scss">
	.nameWord {
		font-size: 50rpx;
		color: rgb(30,111,255); //使用截图工具,获取任意颜色设置
		text-align: center;
	}

</style>px、rpx、em是开发移动端最常见的长度单位:
- px像素(Pixel)。是相对于显示器屏幕分辨率而言的。(引自CSS2.0手册)
- emem是相对长度单位。相对于当前对象内文本的字体尺寸。如当前对行内文本的字体尺寸未被人为设置,则相对于浏览器的默认字体尺寸。(引自CSS2.0手册)浏览器默认的字号是16px。所有未经调整的浏览器都符合: 1em=16px。
- rpx是微信的一种设计方案,如在 iPhone6 上,屏幕宽度为375px,共有750个物理像素,则750rpx = 375px = 750物理像素,1rpx = 0.5px = 1物理像素。
1.3.7 list页面
<template>
    <view class="container">
        <view v-for="(item,index) in items" :key="index">
			<uni-card :title="item.name" :sub-title="item.subTitle" :thumbnail="item.imgSrc">
				<text class="uni-body">
					<text :class="(index%2==0) ? 'userSingular' : 'userPlural'">
						{{item.body}}
					</text>
				</text>
			</uni-card>
		</view>
	</view>
</template>

<script>

	export default {
		data() {
			return {
				items: [{
						name: "Lucy",
						imgSrc: "/static/c1.png",
						subTitle: "c1",
						body: "这里是Lucy的一些信息"
					},
					{
						name: "Tom",
						imgSrc: "/static/c2.png",
						subTitle: "c2",
						body: "这里是Tom的一些信息"
					},
					{
						name: "Jack",
						imgSrc: "/static/c3.png",
						subTitle: "c3",
						body: "这里是Jack的一些信息"
					},
					{
						name: "John",
						imgSrc: "/static/c4.png",
						subTitle: "c4",
						body: "这里是John的一些信息"
					},
					{
						name: "Mary",
						imgSrc: "/static/c5.png",
						subTitle: "c5",
						body: "这里是Mary的一些信息"
					}
				]
			};
		}
	}
</script>


<style lang="scss">
	.container {
		padding: 20rpx;
		font-size: 30rpx;
		line-height: 54rpx;
	}
	.uni-body{
		font-size: 32rpx;
	}
	.userSingular{
		color: blue;
	}
	.userPlural{
		color: orchid;
	}

</style>1.3.8 uni-link 与 navigator
		<uni-link :href="href" :text="href"></uni-link>
		<!-- 此处增加一个导航链接 -->
<navigator url="/pages/hello/hello">hello</navigator>需要注意的是:
:href="href":text="href"说明显示文本内容与链接一致! 前面的冒号表示字符串"href"中包含的是表达式(变量名),而非字符串本身。要计算表达式的值(获取变量的值)navigator标记在这里的作用类似于<a>标记
url中的路径只能是本项目内的页面,而且必须是在 pages.json 中注册的页面
还有更重要的一点:url路径中的页面名称不可带 .vue 扩展名。
1.4 语法应用
1.4.1 v-for
<template>
	<view class="container">
		<view v-for="(item,index) in 5" :key="index">
			<uni-card class="card" :title="name" sub-title="vip":thumbnail="myLogo">
				<text class="uni-body">
					第{{index+1}}个,这是一个带头像和双标题的基础卡片。
					item={{item}}
				</text>
			</uni-card>
		</view>
	</view>
</template>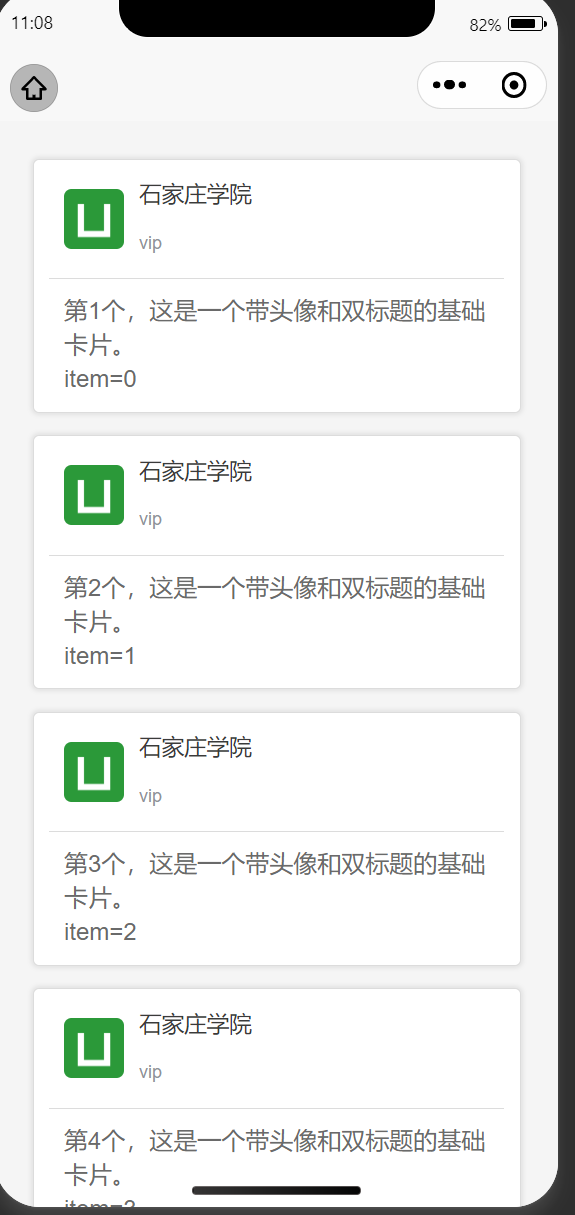
数组渲染
<template>
    <view class="container">
		<view v-for="(item,index) in items" :key="index">
			<uni-card class="card" :title="item.name" sub-title="item.subTitle" :thumbnail="item.imgSrc">
				<text class="uni-body">
					{{index+1}}.{{item.body}}
				</text>
			</uni-card>
		</view>
    </view>
</template>

<script>
	export default {
		data() {
			return {
				items: [{
						name: "Lucy",
						imgSrc: "/static/c1.png",
						subTitle: "c1",
						body: "这里是Lucy的一些信息"
					},
					{
						name: "Tom",
						imgSrc: "/static/c2.png",
						subTitle: "c2",
						body: "这里是Tom的一些信息"
					},
					{
						name: "Jack",
						imgSrc: "/static/c3.png",
						subTitle: "c3",
						body: "这里是Jack的一些信息"
					},
					{
						name: "John",
						imgSrc: "/static/c4.png",
						subTitle: "c4",
						body: "这里是John的一些信息"
					},
					{
						name: "Mary",
						imgSrc: "/static/c5.png",
						subTitle: "c5",
						body: "这里是Mary的一些信息"
					}
				]
			};
		}
	}
</script>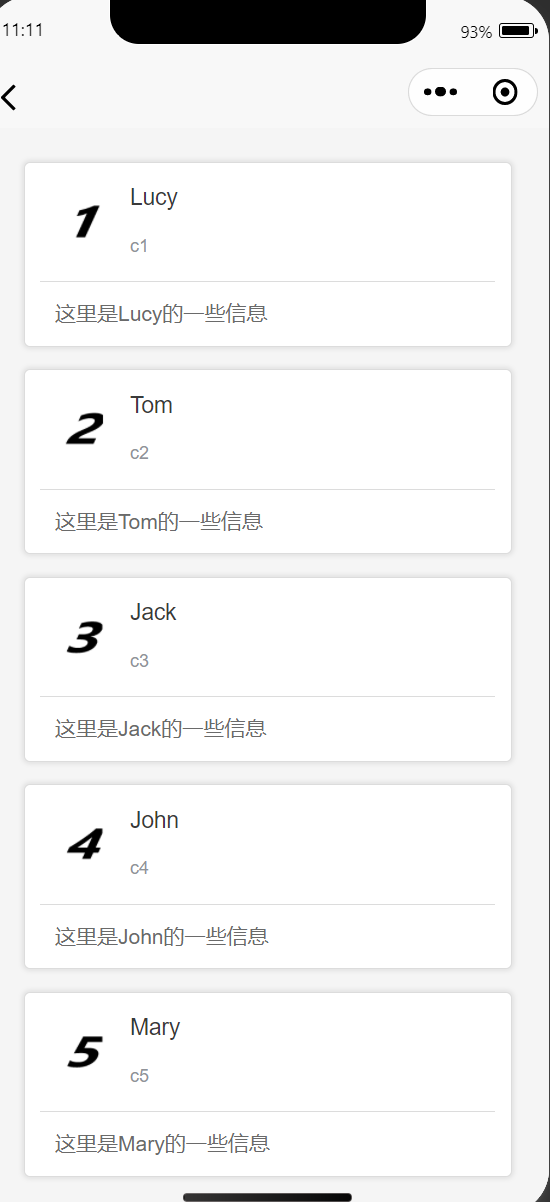
1.4.2 v-if v-else
<template>
    <view class="container">
        <view v-for="(item,index) in items" :key="index">
            <view v-if="(index % 2) == 0">
                <uni-card :title="item.name" :sub-title="item.subTitle" :thumbnail="item.imgSrc">
                    <text class="userSingular">
                         {{ item.body }}
                     </text>
                </uni-card>
            </view>
            <view v-else>
                <uni-card :title="item.name" :sub-title="item.subTitle" :thumbnail="item.imgSrc">
                    <text class="userPlural">{{ item.body }}
                    </text>
                </uni-card>
            </view>
        </view>
    </view>
</template>
<script>

</script>

<style lang="scss">
	.container {
		padding: 20rpx;
		font-size: 30rpx;
		line-height: 54rpx;
	}
	.uni-body{
		font-size: 32rpx;
	}
	.userSingular{
		color: blue;
	}
	.userPlural{
		color: orchid;
	}

</style>使用 “条件表达式 ?value1 : value2”
<template>
    <view class="container">
        <view v-for="(item,index) in items" :key="index">
			<uni-card :title="item.name" :sub-title="item.subTitle" :thumbnail="item.imgSrc">
				<text class="uni-body">
					<text :class="(index%2==0) ? 'userSingular' : 'userPlural'">
						{{item.body}}
					</text>
				</text>
			</uni-card>
		</view>
	</view>
</template>1.5 导航栏添加
{
	"pages": [{
			"path": "pages/index/index",
			"style": {
				// "navigationBarTitleText": "uni-app"
			}
		},
		{
			"path": "pages/heallo/hello",
			"style": {
				// "navigationBarTitleText": "",
				"enablePullDownRefresh": false
			}
		}, {
			"path": "pages/list/list",
			"style": {
				// "navigationBarTitleText": "",
				"enablePullDownRefresh": false
			}
		}
	],
"tabBar": {
		"color": "#7a7e83",
		"selectedColor": "#0faeff",
		"backgroundColor": "#ffffff",
		"list": [
			{
				"pagePath": "pages/index/index",
				"text": "首页",
				"iconPath": "static/icons/home.png",
				"selectedIconPath": "static/icons/home.png"

			},
			{
				"pagePath": "pages/hello/hello",
				"text": "欢迎",
				"iconPath": "static/icons/hello.png",
				"selectedIconPath": "static/icons/hello.png"
			},
			{
				"pagePath": "pages/list/list",
				"text": "列表",
				"iconPath": "static/icons/list.png",
				"selectedIconPath": "static/icons/list.png"
			}
		]
	},
	"globalStyle": {
		"navigationBarTextStyle": "black",
		"navigationBarTitleText": "lihuibear_first_uniapp",
		"navigationBarBackgroundColor": "#F8F8F8",
		"backgroundColor": "#F8F8F8",
		"app-plus": {
			"background": "#efeff4"
		}
	}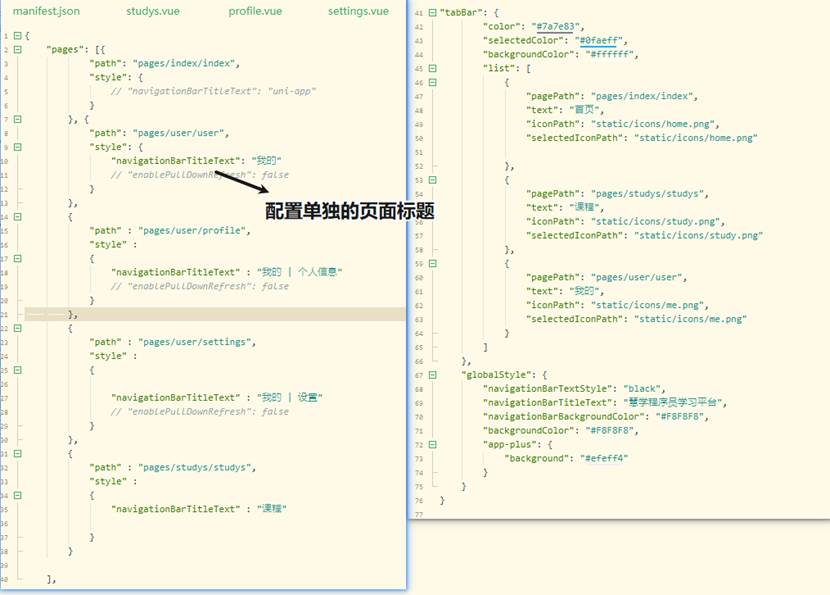
}1.5.1 注意
小程序页面的底部导航其实就是一个 tabBar ,这是通过全局文件 pages.json 进行设置的。
在 tabBar 项的配置代码中,list 里的第一个页面与 pages 中的第一个页面应为同一个,否则将会导致出错。
1.6 作业练习
1.6.1 开发过程
1.6.1.1 项目结构
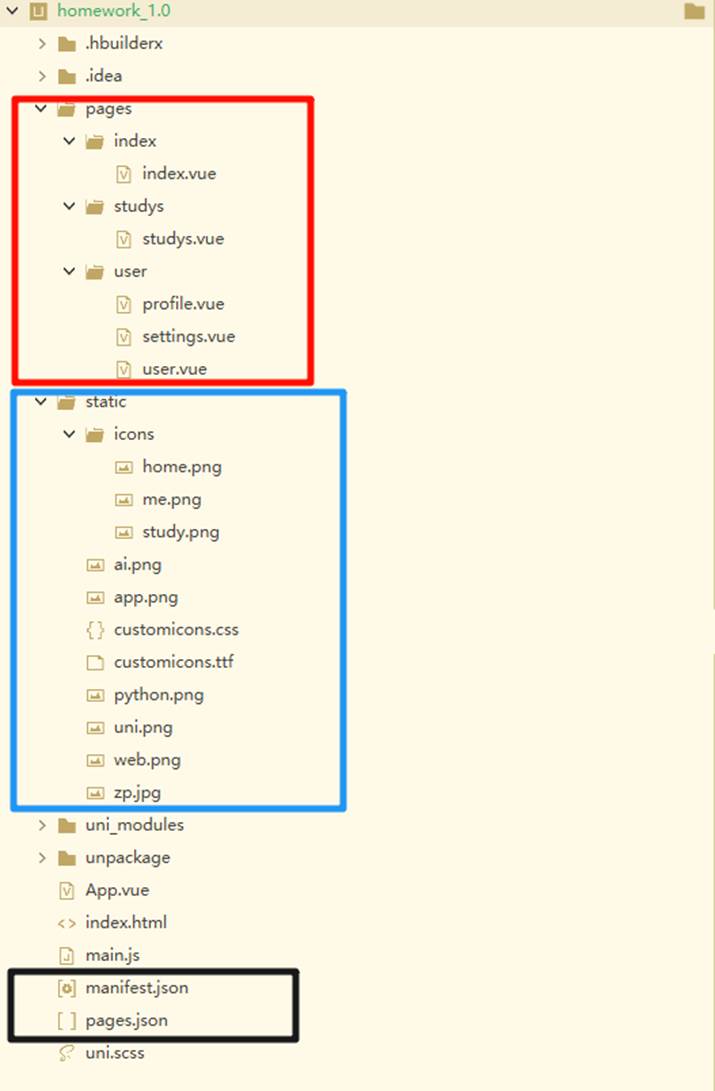
1.6.1.2 项目创建

1.6.1.3 项目配置
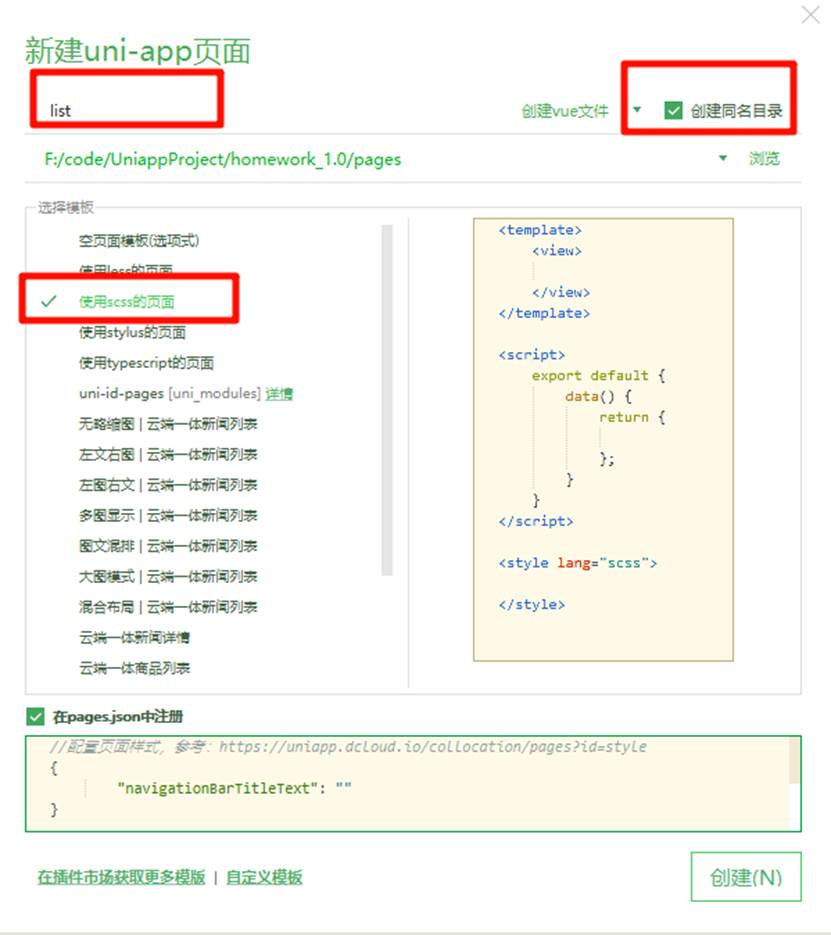
1.6.1.4 新建页面
1.6.1.5 页面设计
| 主页设计 | 学习页面设计 | 我的页面设计 |
|---|---|---|
 | 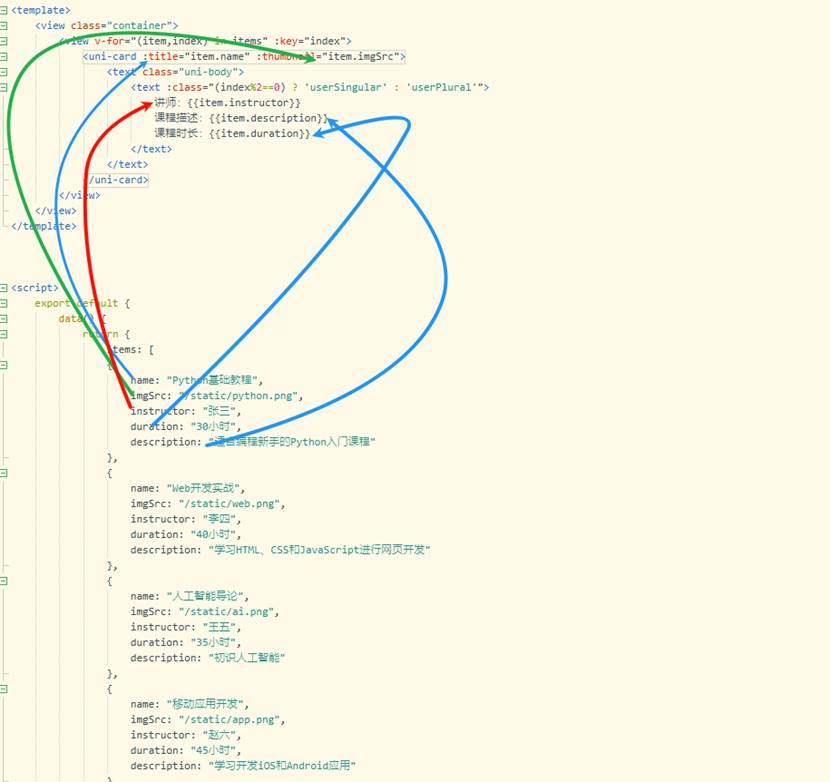 | 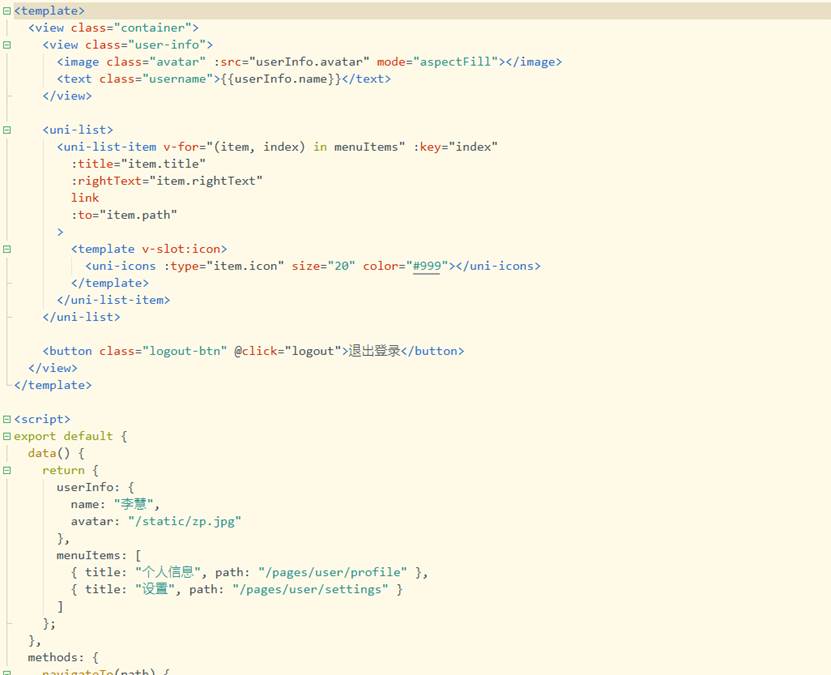 |
| 我的 | 个人信息 | 我的 | 设置 | |
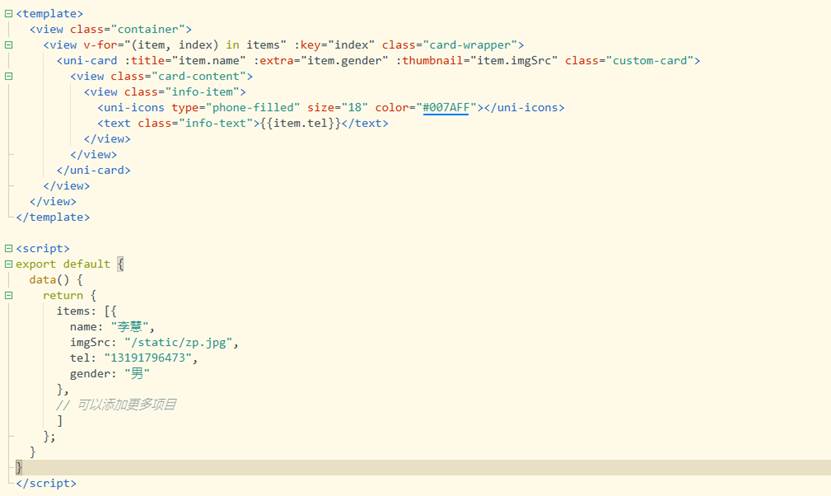 | 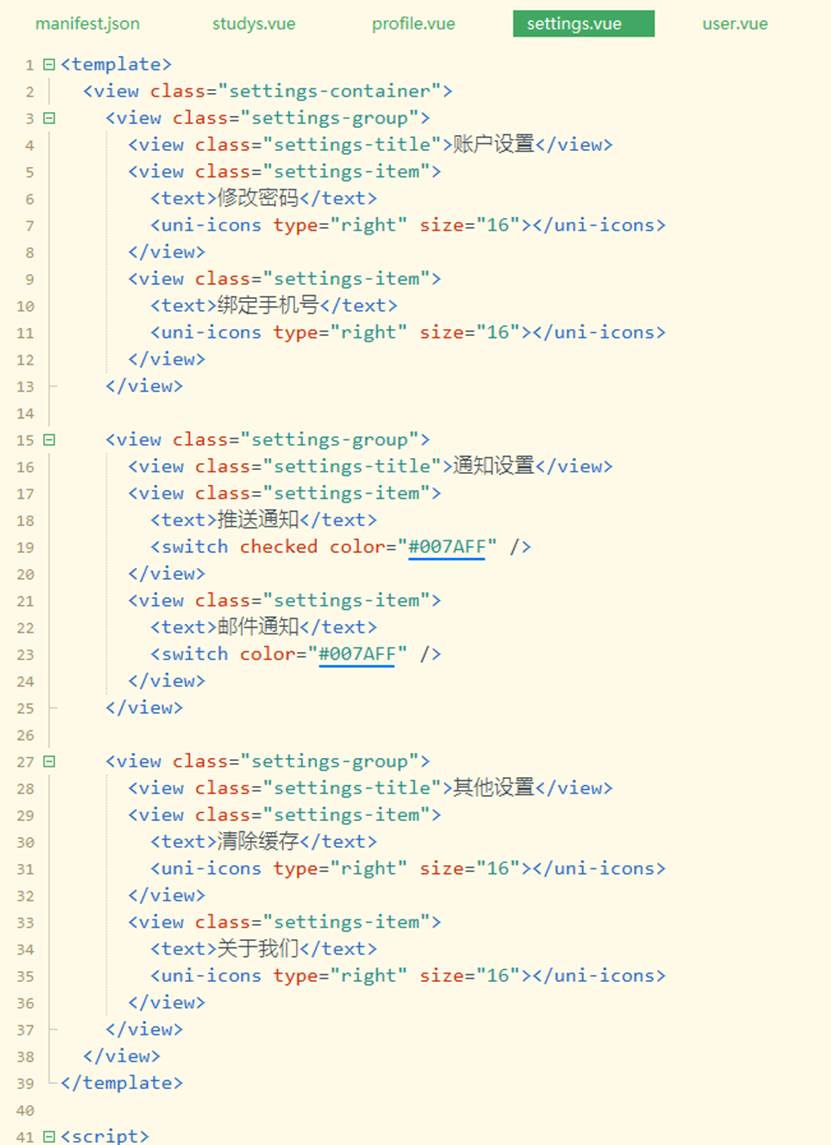 |
1.6.1.6 页面配置
1.6.2 运行结果
| 主页 | 课程页 | 我的页 |
|---|---|---|
 | 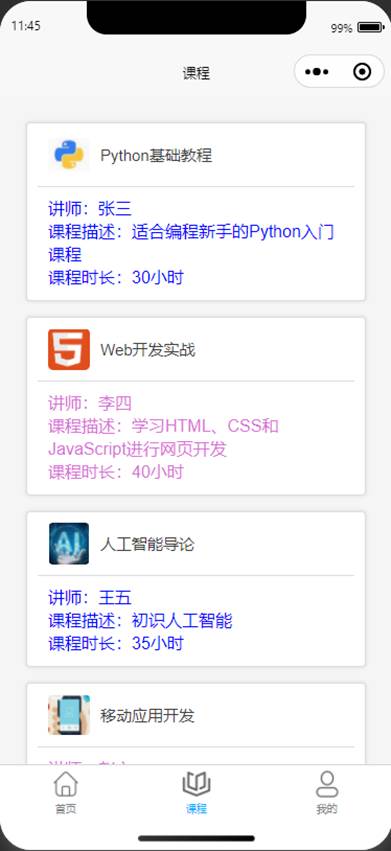 | 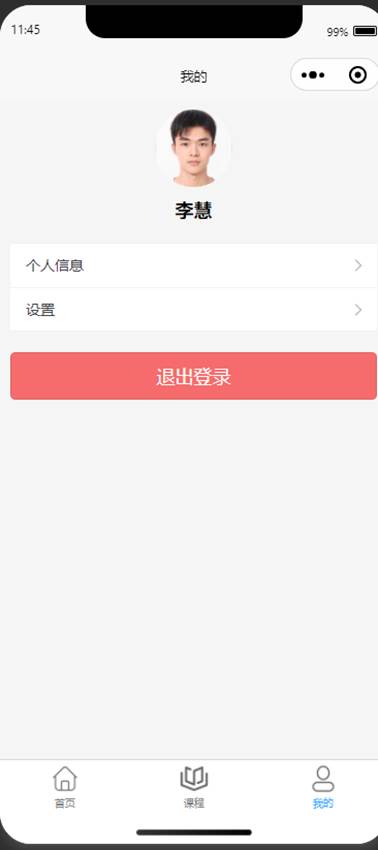 |
| 我的 | 个人信息 | 我的 | 设置 | |
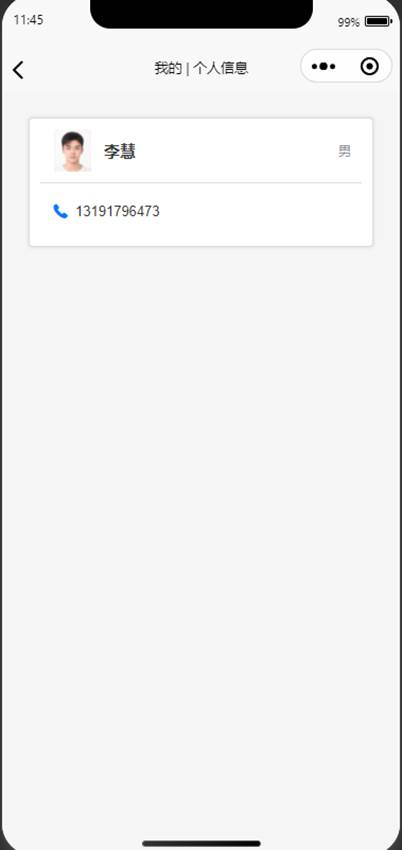 | 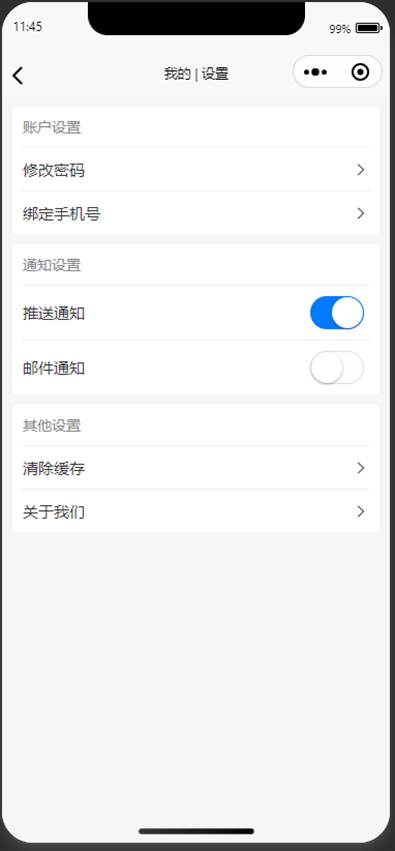 |