智能云图库AI 图片编辑
一、基础图片编辑
需求分析
在日常的图片管理中,用户经常需要对图片进行简单处理,比如裁剪多余部分、旋转图片、放大缩小尺寸等。
因此,我们首先要引入基础图片编辑功能,帮助用户快速完成以下操作:
- 裁剪:支持按固定比例或自由裁剪
- 旋转:提供顺时针、逆时针旋转功能
这个功能非常适合上传证件照之类的场景。
注意,该功能不需要限制仅在空间内才能使用,公共图库也可以支持。
方案设计
图片编辑功能的实现以前端为主,编辑完成后通过调用现有的图片上传接口,将编辑后的图片保存至平台。
具体业务流程:
- 在图片上传页面,如果用户已上传图片,页面会展示“编辑图片”按钮。
- 用户点击“编辑图片”后,将打开图片编辑的弹窗组件,支持裁剪、旋转等操作。
- 用户确认编辑后,会调用图片上传接口,将编辑后的新图片保存至平台,同时更新图片信息。
其实还有另一种设计,在用户每次选择本地或 URL 图片时,先不调用后端的图片上传接口,而是自动弹出图片编辑弹窗组件,编辑完后再保存。但这样做就不是 “扩展功能” 而是 “修改已有功能”,涉及到的代码改动会更多,感兴趣的同学可以尝试实现。
💡 这个地方也能体现出方案设计的重要性,可以通过合适地改变业务流程,降低开发成本,并让项目更利于维护扩展。
前端开发
1、图片编辑组件
图片编辑是个比较常见的功能,一般会有现成的库可以直接用。经过调研,选用开源的 vue-cropper 组件。
1)引入组件CZm7H7UzXaYwPA7yiJL6QwQvTpEobkVBL2T/0TYHiQM=
参考官方文档引入,注意要引入 Vue3 版本的:
安装依赖:
npm install vue-cropper@1.1.4鱼皮编写本教程时,使用的 vue-cropper 版本是 1.1.4,最好跟教程保持一致。
在 main.ts 中引入依赖:
import VueCropper from 'vue-cropper';
import 'vue-cropper/dist/index.css'

app.use(VueCropper)2)新建图片编辑组件 ImageCropper。我们要开发的组件结构包括两部分:上方为图片预览区,下方为操作栏。
在哪里使用图片编辑组件呢?
根据我们的方案设计,图片编辑不应该和任何一种上传图片的方式(本地图片 / URL 上传)进行绑定,是在上传完成后才能编辑,所以应该在图片上传页面引入。
先硬编码要编辑的图片 url:
<ImageCropper imageUrl="https://avatars2.githubusercontent.com/u/15681693?s=460&v=4" />可以参考 官方 Demo 实现组件,依次完成放大、缩小、左旋、右旋操作:
<template>
  <div class="image-cropper">
    <vue-cropper
      ref="cropperRef"
      :img="imageUrl"
      :autoCrop="true"
      :fixedBox="false"
      :centerBox="true"
      :canMoveBox="true"
      :info="true"
      outputType="png"
    />
    <div style="margin-bottom: 16px" />
    <!-- 图片操作 -->
    <div class="image-cropper-actions">
      <a-space>
        <a-button @click="rotateLeft">向左旋转</a-button>
        <a-button @click="rotateRight">向右旋转</a-button>
        <a-button @click="changeScale(1)">放大</a-button>
        <a-button @click="changeScale(-1)">缩小</a-button>
      </a-space>
    </div>
  </div>
</template>

<script setup lang="ts">
import { ref } from 'vue'

interface Props {
  imageUrl?: string
}

const props = defineProps<Props>()

// 编辑器组件的引用
const cropperRef = ref()

// 向左旋转
const rotateLeft = () => {
  cropperRef.value.rotateLeft()
}

// 向右旋转
const rotateRight = () => {
  cropperRef.value.rotateRight()
}

// 缩放
const changeScale = (num: number) => {
  cropperRef.value.changeScale(num)
}
</script>

<style scoped>
.image-cropper {
  text-align: center;
}

.image-cropper .vue-cropper {
  height: 400px;
}
</style>3)编写 “确认按钮”:
<a-space>
  <a-button @click="rotateLeft">向左旋转</a-button>
  <a-button @click="rotateRight">向右旋转</a-button>
  <a-button @click="changeScale(1)">放大</a-button>
  <a-button @click="changeScale(-1)">缩小</a-button>
  <a-button type="primary" :loading="loading" @click="handleConfirm">确认</a-button>
</a-space>点击后,调用 cropper 的 getCropBlob 函数,可以获得裁切后的文件:
// 确认裁剪
const handleConfirm = () => {
  cropperRef.value.getCropBlob((blob: Blob) => {
    // blob 为已裁切的文件
  })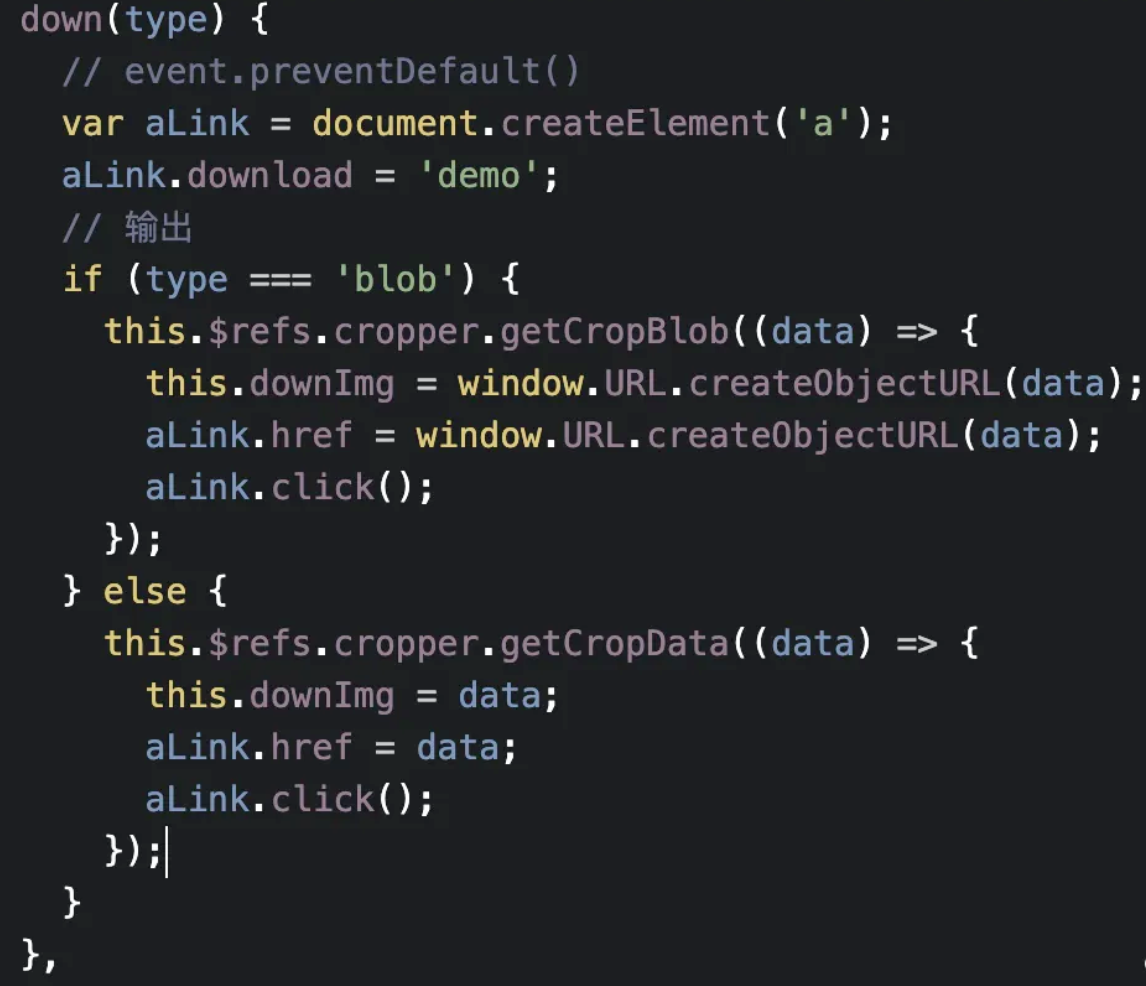
}💡 如果想要点击确认后下载图片,可以参考 demo 的代码实现
2、图片编辑弹窗
将上一步开发的图片编辑组件套到 Ant Design 的弹框组件 内。
1)把最外层从 div 改为 a-modal,注意一定要将 class 类名加在 modal 上,否则样式无法正确添加:
<a-modal class="image-cropper" v-model:visible="visible" title="编辑图片" :footer="false" @cancel="closeModal">
  ... 原有代码
</a-modal>2)参考图片分享弹窗组件,补充控制弹窗显示隐藏的相关代码,并对外暴露打开弹窗的 openModal 函数:
// 是否可见
const visible = ref(false)

// 打开弹窗
const openModal = () => {
  visible.value = true
}

// 关闭弹窗
const closeModal = () => {
  visible.value = false
}

// 暴露函数给父组件
defineExpose({
  openModal,
})3、上传编辑后的图片
点击确认后,需要上传编辑后的图片。我们可以把图片编辑组件当做是图片上传组件的一种,而不和任何一种上传图片的方式(本地图片 / URL 上传)进行绑定。
1)参考图片上传组件的属性,给组件补充 picture 和 spaceId、onSuccess 属性:
interface Props {
  imageUrl?: string
  picture?: API.PictureVO
  spaceId?: number
  onSuccess?: (newPicture: API.PictureVO) => void
}2)编写上传函数。点击确认后将 blob 数据转换为 file 对象,然后就可以复用图片上传组件的提交函数了,上传成功后会传递新图片信息给父组件、并关闭弹窗。代码如下:
const loading = ref<boolean>(false)

// 确认裁剪
const handleConfirm = () => {
  cropperRef.value.getCropBlob((blob: Blob) => {
    const fileName = (props.picture?.name || 'image') + '.png'
    const file = new File([blob], fileName, { type: blob.type })
    // 上传图片
    handleUpload({ file })
  })
}

/**
 * 上传
 * @param file
 */
const handleUpload = async ({ file }: any) => {
  loading.value = true
  try {
    const params: API.PictureUploadRequest = props.picture ? { id: props.picture.id } : {}
    params.spaceId = props.spaceId
    const res = await uploadPictureUsingPost(params, {}, file)
    if (res.data.code === 0 && res.data.data) {
      message.success('图片上传成功')
      // 将上传成功的图片信息传递给父组件
      props.onSuccess?.(res.data.data)
      closeModal();
    } else {
      message.error('图片上传失败,' + res.data.message)
    }
  } catch (error) {
    message.error('图片上传失败')
  } finally {
    loading.value = false
  }
}4、使用图片编辑弹窗组件
在创建图片页面使用组件,可以在图片下方补充一个编辑按钮,点击编辑按钮后打开弹窗:
<div v-if="picture" class="edit-bar">
  <a-button :icon="h(EditOutlined)" @click="doEditPicture">编辑图片</a-button>
  <ImageCropper
    ref="imageCropperRef"
    imageUrl="https://avatars2.githubusercontent.com/u/15681693?s=460&v=4"
    :picture="picture"
    :spaceId="spaceId"
    :onSuccess="onCropSuccess"
  />
</div>编辑图片事件函数:
// 图片编辑弹窗引用
const imageCropperRef = ref()

// 编辑图片
const doEditPicture = () => {
  if (imageCropperRef.value) {
    imageCropperRef.value.openModal()
  }
}

// 编辑成功事件
const onCropSuccess = (newPicture: API.PictureVO) => {
  picture.value = newPicture
}适当优化一下 CSS 样式,增加上下边距和居中:
#addPicturePage .edit-bar {
  text-align: center;
  margin: 16px 0;
}开发完成后,把 imageUrl 的值改为要编辑的图片地址:
<ImageCropper
  ref="imageCropperRef"
  :imageUrl="picture?.url"
  :picture="picture"
  :spaceId="spaceId"
  :onSuccess="onSuccess"
/>结果,发现图片无法正常显示,会出现跨域问题!
5、图片跨域问题解决
跨域问题之前我们已经经历过了,是因为前端域名和服务器(对象存储)的域名不一样导致的。
解决跨域问题的方式有很多,因为我们的图片地址全部都是同一个对象存储 URL,所以可以直接登录云平台来修改对象存储的跨域访问 CORS 设置,直接给特定的源站(域名 + 端口)开放跨域。
然后再次测试编辑图片功能,图片就正常加载了
扩展知识 - 通过代理解决跨域
可以通过 Vite 自带的本地代理服务器,先替换图片的访问地址为前端地址,然后通过代理服务器转发到对象存储路径,实现访问。
获取图片的参考代码:
/**
 * 获取图片 blob 对象和 base64
 * @param url 图片 url
 * @param cb 回调函数,返回 blob url 和 base64
 */
export const fetchImageAsBlob = async (
  url?: string,
  cb?: (blobUrl: string, base64: string) => void,
) => {
  if (!url) return
  const formatUrl = url.replace('https://pic.code-nav.cn', window.location.origin)
  try {
    const response = await fetch(formatUrl)
    if (!response.ok) {
      throw new Error('图片加载失败')
    }
    const imageBlob = await response.blob()
    const objectUrl = URL.createObjectURL(imageBlob)

    // 转换为 base64
    const reader = new FileReader()
    reader.readAsDataURL(imageBlob)
    reader.onloadend = () => {
      const base64 = reader.result as string
      cb?.(objectUrl, base64)
    }
  } catch (error: any) {
    console.log(error)
  }
}参考 vite 配置:
server: {
  host: 'localhost',
  // 代理
  proxy: {
    // 改为你的图片存储 url 前缀
    '/yu_picture': {
      // 改为你的对象存储域名
      target: 'https://codefather.cn',
      changeOrigin: true,
    }
  },
},扩展
1)优化业务流程:在图片上传前,先触发编辑弹窗,完成图片裁剪后再上传到后端。这样需要将编辑图片整合到图片上传组件内部,而不是平级的关系。
2)支持调整裁剪区域的固定比例(比如 16:9),实现思路是利用 vue-cropper 组件的 fixedNumber 属性,参考代码:
<!-- 比例选择 -->
<div class="aspect-ratio-selector">
  <a-radio-group v-model:value="aspectRatio" button-style="solid">
    <a-radio-button value="free">自由比例</a-radio-button>
    <a-radio-button value="1:1">1:1</a-radio-button>
    <a-radio-button value="4:3">4:3</a-radio-button>
    <a-radio-button value="16:9">16:9</a-radio-button>
    <a-radio-button value="3:4">3:4</a-radio-button>
    <a-radio-button value="9:16">9:16</a-radio-button>
  </a-radio-group>
</div>

<vue-cropper
  ref="cropperRef"
  :img="imageUrl"
  :autoCrop="true"
  :fixedBox="false"
  :centerBox="true"
  :canMoveBox="true"
  :info="true"
  outputType="png"
  :fixed="aspectRatio !== 'free'"
  :fixedNumber="currentAspectRatio"
/>

const aspectRatio = ref('free')

// 计算当前宽高比
const currentAspectRatio = computed(() => {
  if (aspectRatio.value === 'free') return [0, 0]
  const [width, height] = aspectRatio.value.split(':').map(Number)
  return [width, height]
})3)支持图片的任意角度旋转操作
4)支持对图片尺寸进行等比例放大的操作
二、AI 图片编辑
需求分析
随着 AI 的高速发展,AI 几乎可以应用到任何传统业务中,增强应用的功能,带给用户更好的体验。
对于图库网站来说,AI 也有非常多的应用空间,比如可以利用 AI 绘图大模型来编辑图片,实现扩图、擦除补全、图配文、去水印等功能。
以 AI 扩图功能为例,让我们来学习如何在项目中快速接入 AI 绘图大模型。用户可以选择一张已上传的图片,通过 AI 编辑得到新的图片,并根据情况自行选择是否保存。
注意,该功能不用限制仅在空间内才能使用,公共图库也可以支持。
方案设计
1、AI 绘图大模型选择
AI 绘图大模型我们自己是搞不来的,可以选择一个市面上支持 AI 绘图的大模型。
选择 AI 大模型时,我们最关注的应该是生成效果、生成速度还有价格了吧?当然,对我们学习来说,最关注的还是价格,毕竟绘画大模型的费用不低。
国外比较知名的就是 Midjourney,鱼皮以前用的就是这个,不过不仅开发对接麻烦,价格也比较贵。国内的 AI 绘图大模型比较推荐 阿里云百炼 ,它是一站式的大模型开发及应用构建平台,可以通过简单的界面操作,在 5 分钟内开发出一款大模型应用,并在线体验效果。
创建好应用后,利用官方提供的 API 或 SDK,直接通过几行代码,就能在项目中使用大模型应用
通过阅读 官方文档,发现它是支持 AI 图像编辑与生成功能的,包括 AI 扩图,支持 HTTP 调用,符合我们的需求。
在 控制台 也能看到对应的图像画面扩展模型
百炼的大模型提供了 新人免费额度,可以通过文档或者点进大模型了解,对于学习用来说足够了
经过鱼皮的测试,图片生成效果、生成速度都是不错的,因此,本项目将选用阿里云百炼实现 AI 扩图功能。
💡 建议之前没接触过类似 AI 大模型平台的同学,先多利用网页控制台熟悉 AI 大模型的 Prompt、了解不同大模型的区别。推荐一个 AI 学习网站
2、调用方式
通过阅读 AI 图像扩展的官方文档,我们发现,API 只支持异步方式调用。
这是因为 AI 绘画任务计算量大且耗时长,同步调用会导致服务器线程长时间被单个任务占用,限制了并发处理能力,增加了超时和系统崩溃的风险。通过异步调用,服务器可以将任务放入队列中,合理调度资源,避免阻塞主线程,从而更高效地服务多个用户请求,提升整体系统的稳定性和可扩展性。
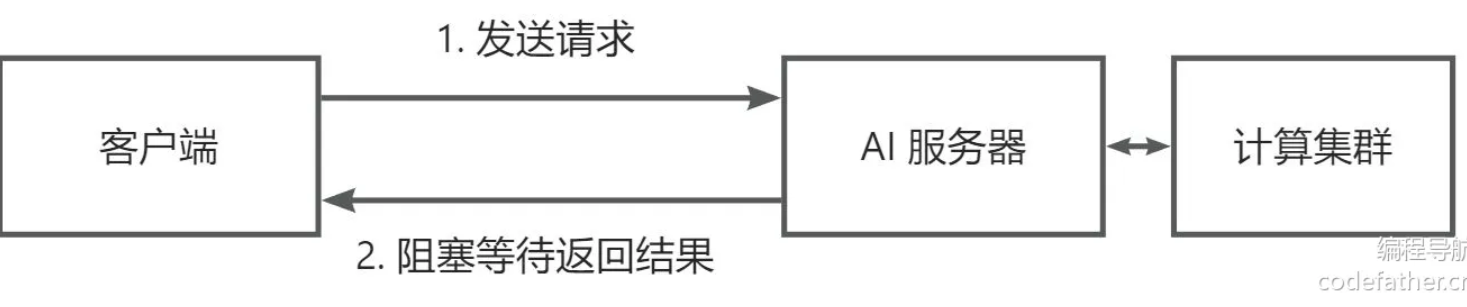
同步调用流程如下,好处是客户端可以直接获取到结果,调用更方便:
异步调用流程如下,客户端需要在提交任务后,不断轮询请求,来检查任务是否执行完成:
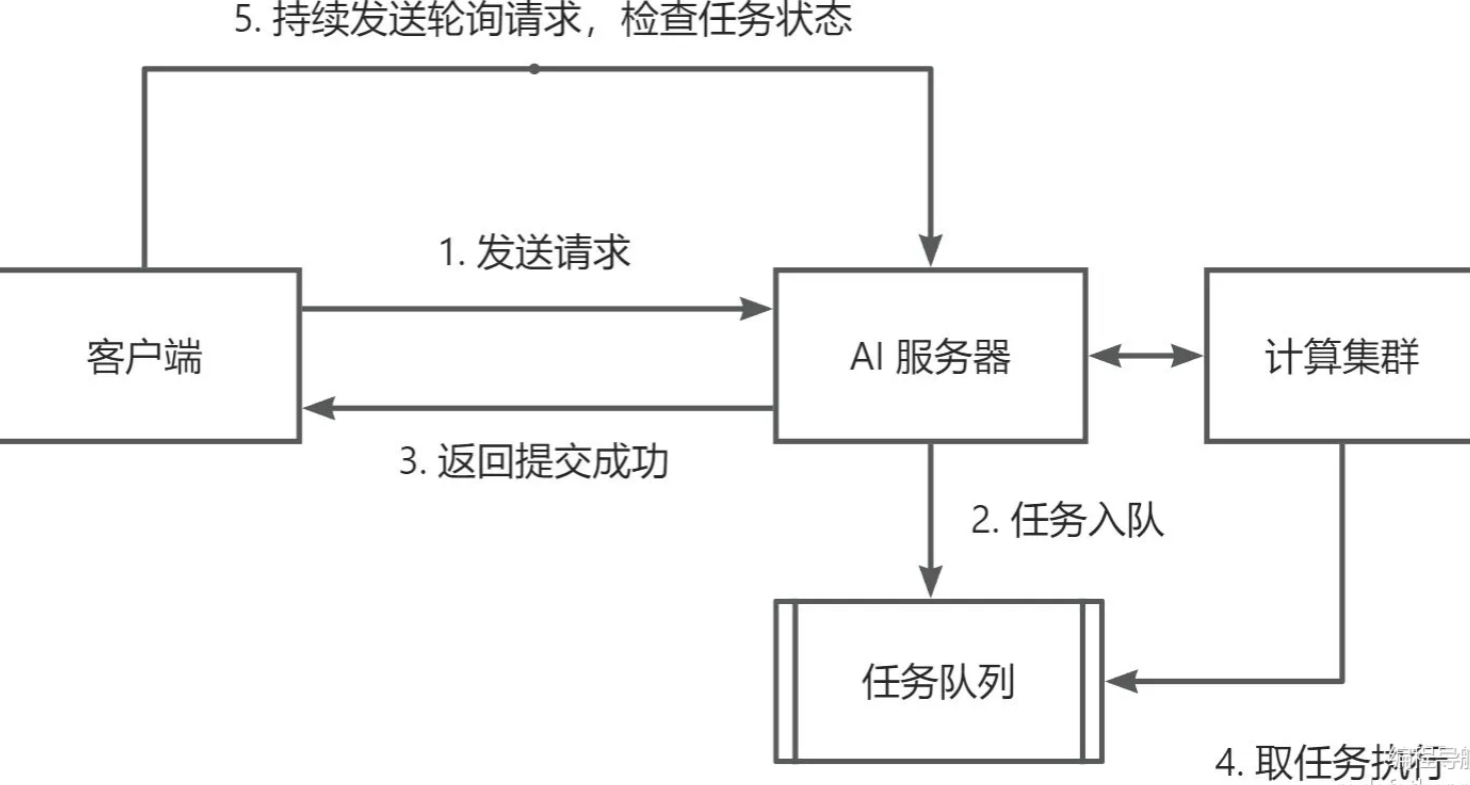
由于 AI 接口已经选择了异步调用,所以我们作为要调用 AI 接口的客户端,要使用轮询的方式来检查任务状态是否为 “已完成”,如果完成了,才可以获取到生成的图片。
那么是前端轮询还是后端轮询呢?
1)前端轮询
前端调用后端提交任务后得到任务 ID,然后通过定时器轮询请求查询任务状态接口,直到任务完成或失败。示例代码:
// 提交任务
async function submitTask() {
  const response = await fetch('/api/createTask', { method: 'POST' });
  const { taskId } = await response.json();
  checkTaskStatus(taskId);
}

// 调用
submitTask();

// 检查任务状态
async function checkTaskStatus(taskId) {
  const intervalId = setInterval(async () => {
    const response = await fetch(`/api/taskStatus?taskId=${taskId}`);
    const { status, result } = await response.json();

    if (status === 'success') {
      console.log('Task completed:', result);
      clearInterval(intervalId); // 停止轮询
    } else if (status === 'failed') {
      console.error('Task failed');
      clearInterval(intervalId); // 停止轮询
    }
  }, 2000); // 每隔 2 秒轮询
}2)后端轮询
后端通过循环或定时任务检测任务状态,接口保持阻塞,直到任务完成或失败,直接返回结果给前端。示例代码:
@RestController
public class TaskController {

    @PostMapping("/createTask")
    public String createTask() {
        String taskId = taskService.submitTask();
        return taskId;
    }

    @GetMapping("/waitForTask")
    public ResponseEntity<String> waitForTask(@RequestParam String taskId) {
        while (true) {
            String status = taskService.checkTaskStatus(taskId);

            if ("success".equals(status)) {
                return ResponseEntity.ok("Task completed");
            } else if ("failed".equals(status)) {
                return ResponseEntity.status(HttpStatus.INTERNAL_SERVER_ERROR).body("Task failed");
            }

            try {
                Thread.sleep(2000); // 等待 2 秒后重试
            } catch (InterruptedException e) {
                return ResponseEntity.status(HttpStatus.INTERNAL_SERVER_ERROR).body("Error occurred");
            }
        }
    }
}显然,后端轮询容易因为任务阻塞导致资源耗尽,所以通常推荐 前端轮询。除非有明确的需求要求时,才考虑后端轮询,比如任务结果需实时返回且对网络请求数敏感。(或者学习时不想写前端的同学哈哈)
此处我们也选择前端轮询方案实现。
💡 从这个方案设计中,我们也能感受到,如果你同时了解前端和后端,可以结合二者设计出更合理的方案,而不是把所有的 “重担” 都交给前端或者后端一方。所以企业中开需求评审会或者讨论方案时,前后端需要紧密协作。
下面进入开发。
后端开发
1、AI 扩图 API
首先开发业务依赖的基础能力,也就是 AI 扩图 API。
1)需要先进入 阿里云百炼控制台 开通服务:
开通推理能力:
2)开通之后,我们要在控制台获取 API Key,可 参考文档:
能够在控制台查看到 API Key,注意,API Key 一定不要对外泄露!
通过阅读文档发现,百炼支持通过 SDK 或 HTTP 调用。虽然官方写的支持 Java SDK,但 AI 扩图功能中对 SDK 的介绍非常少,此处考虑到兼容性,我们还是 使用 HTTP 调用。
由于使用异步的方式,需要开发创建任务和查询结果 2 个 API:

3)在配置文件中填写获取到的 apiKey:
# 阿里云 AI 配置
aliYunAi:
apiKey: xxxx4)新建数据模型类
在 api 包下新建 aliyunai 包,存放阿里云 AI 相关代码。
在 aliyunai.model 包下新建数据模型类,可以让 AI 根据官方文档中的请求响应信息自动生成,无需自己手动编写。
由于每个 AI 图片处理操作的请求响应都有一些区别,所以单独给 AI 扩图功能编写具体的请求响应类。
创建扩图任务请求类:
@Data
public class CreateOutPaintingTaskRequest implements Serializable {

    /**
     * 模型,例如 "image-out-painting"
     */
    private String model = "image-out-painting";

    /**
     * 输入图像信息
     */
    private Input input;

    /**
     * 图像处理参数
     */
    private Parameters parameters;

    @Data
    public static class Input {
        /**
         * 必选,图像 URL
         */
        @Alias("image_url")
        private String imageUrl;
    }

    @Data
    public static class Parameters implements Serializable {
        /**
         * 可选,逆时针旋转角度,默认值 0,取值范围 [0, 359]
         */
        private Integer angle;

        /**
         * 可选,输出图像的宽高比,默认空字符串,不设置宽高比
         * 可选值:["", "1:1", "3:4", "4:3", "9:16", "16:9"]
         */
        @Alias("output_ratio")
        private String outputRatio;

        /**
         * 可选,图像居中,在水平方向上按比例扩展,默认值 1.0,范围 [1.0, 3.0]
         */
        @Alias("x_scale")
        @JsonProperty("xScale")
        private Float xScale;

        /**
         * 可选,图像居中,在垂直方向上按比例扩展,默认值 1.0,范围 [1.0, 3.0]
         */
        @Alias("y_scale")
        @JsonProperty("yScale")
        private Float yScale;

        /**
         * 可选,在图像上方添加像素,默认值 0
         */
        @Alias("top_offset")
        private Integer topOffset;

        /**
         * 可选,在图像下方添加像素,默认值 0
         */
        @Alias("bottom_offset")
        private Integer bottomOffset;

        /**
         * 可选,在图像左侧添加像素,默认值 0
         */
        @Alias("left_offset")
        private Integer leftOffset;

        /**
         * 可选,在图像右侧添加像素,默认值 0
         */
        @Alias("right_offset")
        private Integer rightOffset;

        /**
         * 可选,开启图像最佳质量模式,默认值 false
         * 若为 true,耗时会成倍增加
         */
        @Alias("best_quality")
        private Boolean bestQuality;

        /**
         * 可选,限制模型生成的图像文件大小,默认值 true
         * - 单边长度 <= 10000:输出图像文件大小限制为 5MB 以下
         * - 单边长度 > 10000:输出图像文件大小限制为 10MB 以下
         */
        @Alias("limit_image_size")
        private Boolean limitImageSize;

        /**
         * 可选,添加 "Generated by AI" 水印,默认值 true
         */
        @Alias("add_watermark")
        private Boolean addWatermark = false;
    }
}注意,上述代码中,某些字段打上了 Hutool 工具类的 @Alias 注解,这个注解仅对 Hutool 的 JSON 转换生效,对 SpringMVC 的 JSON 转换没有任何影响。
💡 这里有一个巨坑的地方!经过测试发现,前端如果传递参数名 xScale,是无法赋值给 xScale 字段的;但是传递参数名 xscale,就可以赋值。这是因为 SpringMVC 对于第二个字母是大写的参数无法映射(和参数类别无关),参考博客。
解决方案是,给这些字段增加 @JsonProperty 注解:
/**
 * 可选,图像居中,在水平方向上按比例扩展,默认值 1.0,范围 [1.0, 3.0]
 */
@Alias("x_scale")
@JsonProperty("xScale")
private Float xScale;

/**
 * 可选,图像居中,在垂直方向上按比例扩展,默认值 1.0,范围 [1.0, 3.0]
 */
@Alias("y_scale")
@JsonProperty("yScale")
private Float yScale;为什么 SpringMVC 要这样设计呢?鱼皮通过查阅了解到,这是因为 Jackson 在处理字段名与 JSON 属性名映射时,会依赖 Java 的 标准命名规范 和 反射 API。
举个例子,根据 JavaBean 的规范,属性名称与其访问器方法(getter 和 setter)之间的映射规则是:如果属性名以小写字母开头,第二个字母是大写(如 eMail),规范仍认为属性名称是 eMail,而访问器方法应为 geteMail() 和 seteMail()。但 Jackson 会尝试推断属性名为 email(因为 eMail 不常见),从而导致 JSON 中 eMail 或 email 可能无法正确映射。
创建扩图任务响应类:
@Data
@NoArgsConstructor
@AllArgsConstructor
public class CreateOutPaintingTaskResponse {

    private Output output;

    /**
     * 表示任务的输出信息
     */
    @Data
    public static class Output {

        /**
         * 任务 ID
         */
        private String taskId;

        /**
         * 任务状态
         * <ul>
         *     <li>PENDING:排队中</li>
         *     <li>RUNNING:处理中</li>
         *     <li>SUSPENDED:挂起</li>
         *     <li>SUCCEEDED:执行成功</li>
         *     <li>FAILED:执行失败</li>
         *     <li>UNKNOWN:任务不存在或状态未知</li>
         * </ul>
         */
        private String taskStatus;
    }

    /**
     * 接口错误码。
     * <p>接口成功请求不会返回该参数。</p>
     */
    private String code;

    /**
     * 接口错误信息。
     * <p>接口成功请求不会返回该参数。</p>
     */
    private String message;

    /**
     * 请求唯一标识。
     * <p>可用于请求明细溯源和问题排查。</p>
     */
    private String requestId;

}查询任务响应类:
@Data
@NoArgsConstructor
@AllArgsConstructor
public class GetOutPaintingTaskResponse {

    /**
     * 请求唯一标识
     */
    private String requestId;

    /**
     * 输出信息
     */
    private Output output;

    /**
     * 表示任务的输出信息
     */
    @Data
    public static class Output {

        /**
         * 任务 ID
         */
        private String taskId;

        /**
         * 任务状态
         * <ul>
         *     <li>PENDING:排队中</li>
         *     <li>RUNNING:处理中</li>
         *     <li>SUSPENDED:挂起</li>
         *     <li>SUCCEEDED:执行成功</li>
         *     <li>FAILED:执行失败</li>
         *     <li>UNKNOWN:任务不存在或状态未知</li>
         * </ul>
         */
        private String taskStatus;

        /**
         * 提交时间
         * 格式:YYYY-MM-DD HH:mm:ss.SSS
         */
        private String submitTime;

        /**
         * 调度时间
         * 格式:YYYY-MM-DD HH:mm:ss.SSS
         */
        private String scheduledTime;

        /**
         * 结束时间
         * 格式:YYYY-MM-DD HH:mm:ss.SSS
         */
        private String endTime;

        /**
         * 输出图像的 URL
         */
        private String outputImageUrl;

        /**
         * 接口错误码
         * <p>接口成功请求不会返回该参数</p>
         */
        private String code;

        /**
         * 接口错误信息
         * <p>接口成功请求不会返回该参数</p>
         */
        private String message;

        /**
         * 任务指标信息
         */
        private TaskMetrics taskMetrics;
    }

    /**
     * 表示任务的统计信息
     */
    @Data
    public static class TaskMetrics {

        /**
         * 总任务数
         */
        private Integer total;

        /**
         * 成功任务数
         */
        private Integer succeeded;

        /**
         * 失败任务数
         */
        private Integer failed;
    }
}5)开发 API 调用类,通过 Hutool 的 HTTP 请求工具类来调用阿里云百炼的 API:
@Slf4j
@Component
public class AliYunAiApi {
    // 读取配置文件
    @Value("${aliYunAi.apiKey}")
    private String apiKey;

    // 创建任务地址
    public static final String CREATE_OUT_PAINTING_TASK_URL = "https://dashscope.aliyuncs.com/api/v1/services/aigc/image2image/out-painting";

    // 查询任务状态
    public static final String GET_OUT_PAINTING_TASK_URL = "https://dashscope.aliyuncs.com/api/v1/tasks/%s";

    /**
     * 创建任务
     *
     * @param createOutPaintingTaskRequest
     * @return
     */
    public CreateOutPaintingTaskResponse createOutPaintingTask(CreateOutPaintingTaskRequest createOutPaintingTaskRequest) {
        if (createOutPaintingTaskRequest == null) {
            throw new BusinessException(ErrorCode.OPERATION_ERROR, "扩图参数为空");
        }
        // 发送请求
        HttpRequest httpRequest = HttpRequest.post(CREATE_OUT_PAINTING_TASK_URL)
                .header(Header.AUTHORIZATION, "Bearer " + apiKey)
                // 必须开启异步处理,设置为enable。
                .header("X-DashScope-Async", "enable")
                .header(Header.CONTENT_TYPE, ContentType.JSON.getValue())
                .body(JSONUtil.toJsonStr(createOutPaintingTaskRequest));
        try (HttpResponse httpResponse = httpRequest.execute()) {
            if (!httpResponse.isOk()) {
                log.error("请求异常:{}", httpResponse.body());
                throw new BusinessException(ErrorCode.OPERATION_ERROR, "AI 扩图失败");
            }
            CreateOutPaintingTaskResponse response = JSONUtil.toBean(httpResponse.body(), CreateOutPaintingTaskResponse.class);
            String errorCode = response.getCode();
            if (StrUtil.isNotBlank(errorCode)) {
                String errorMessage = response.getMessage();
                log.error("AI 扩图失败,errorCode:{}, errorMessage:{}", errorCode, errorMessage);
                throw new BusinessException(ErrorCode.OPERATION_ERROR, "AI 扩图接口响应异常");
            }
            return response;
        }
    }

    /**
     * 查询创建的任务
     *
     * @param taskId
     * @return
     */
    public GetOutPaintingTaskResponse getOutPaintingTask(String taskId) {
        if (StrUtil.isBlank(taskId)) {
            throw new BusinessException(ErrorCode.OPERATION_ERROR, "任务 id 不能为空");
        }
        try (HttpResponse httpResponse = HttpRequest.get(String.format(GET_OUT_PAINTING_TASK_URL, taskId))
                .header(Header.AUTHORIZATION, "Bearer " + apiKey)
                .execute()) {
            if (!httpResponse.isOk()) {
                throw new BusinessException(ErrorCode.OPERATION_ERROR, "获取任务失败");
            }
            return JSONUtil.toBean(httpResponse.body(), GetOutPaintingTaskResponse.class);
        }
    }
}注意,要按照官方文档的要求给请求头增加鉴权信息,拼接配置中写好的 apiKey:
2、扩图服务
在 model.dto.picture 包下新建 AI 扩图请求类,用于接受前端传来的参数并传递给 Service 服务层。字段包括图片 id 和扩图参数:
@Data
public class CreatePictureOutPaintingTaskRequest implements Serializable {

    /**
     * 图片 id
     */
    private Long pictureId;

    /**
     * 扩图参数
     */
    private CreateOutPaintingTaskRequest.Parameters parameters;

    private static final long serialVersionUID = 1L;
}在图片服务中编写创建扩图任务方法,从数据库中获取图片信息和 url 地址,构造请求参数后调用 api 创建扩图任务。注意,如果图片有空间 id,则需要校验权限,直接复用以前的权限校验方法。
@Override
public CreateOutPaintingTaskResponse createPictureOutPaintingTask(CreatePictureOutPaintingTaskRequest createPictureOutPaintingTaskRequest, User loginUser) {
    // 获取图片信息
    Long pictureId = createPictureOutPaintingTaskRequest.getPictureId();
    Picture picture = Optional.ofNullable(this.getById(pictureId))
            .orElseThrow(() -> new BusinessException(ErrorCode.NOT_FOUND_ERROR));
    // 权限校验
    checkPictureAuth(loginUser, picture);
    // 构造请求参数
    CreateOutPaintingTaskRequest taskRequest = new CreateOutPaintingTaskRequest();
    CreateOutPaintingTaskRequest.Input input = new CreateOutPaintingTaskRequest.Input();
    input.setImageUrl(picture.getUrl());
    taskRequest.setInput(input);
    BeanUtil.copyProperties(createPictureOutPaintingTaskRequest, taskRequest);
    // 创建任务
    return aliYunAiApi.createOutPaintingTask(taskRequest);
}3、扩图接口
在 PictureController 添加 AI 扩图接口,包括创建任务和查询任务状态接口:
/**
 * 创建 AI 扩图任务
 */
@PostMapping("/out_painting/create_task")
public BaseResponse<CreateOutPaintingTaskResponse> createPictureOutPaintingTask(
        @RequestBody CreatePictureOutPaintingTaskRequest createPictureOutPaintingTaskRequest,
        HttpServletRequest request) {
    if (createPictureOutPaintingTaskRequest == null || createPictureOutPaintingTaskRequest.getPictureId() == null) {
        throw new BusinessException(ErrorCode.PARAMS_ERROR);
    }
    User loginUser = userService.getLoginUser(request);
    CreateOutPaintingTaskResponse response = pictureService.createPictureOutPaintingTask(createPictureOutPaintingTaskRequest, loginUser);
    return ResultUtils.success(response);
}

/**
 * 查询 AI 扩图任务
 */
@GetMapping("/out_painting/get_task")
public BaseResponse<GetOutPaintingTaskResponse> getPictureOutPaintingTask(String taskId) {
    ThrowUtils.throwIf(StrUtil.isBlank(taskId), ErrorCode.PARAMS_ERROR);
    GetOutPaintingTaskResponse task = aliYunAiApi.getOutPaintingTask(taskId);
    return ResultUtils.success(task);
}前端开发
可以参考基础编辑图片的交互流程,在编辑图片按钮旁边添加 AI 扩图按钮,点击之后显示弹窗进行 AI 扩图操作。
这样可以将 AI 操作的逻辑封装到单独的组件中,让创建图片页面的代码更精简。
1、AI 扩图弹窗
1)先复制之前开发好的裁剪图片弹窗,保留控制弹窗显示隐藏的逻辑,修改弹窗的标题:
<template>
  <a-modal
    class="image-out-painting"
    v-model:visible="visible"
    title="AI 扩图"
    :footer="false"
    @cancel="closeModal"
  >

  </a-modal>
</template>

<script setup lang="ts">
import { ref } from 'vue'
import { uploadPictureUsingPost } from '@/api/pictureController'
import { message } from 'ant-design-vue'

interface Props {
  picture?: API.PictureVO
  spaceId?: number
  onSuccess?: (newPicture: API.PictureVO) => void
}

const props = defineProps<Props>()

// 是否可见
const visible = ref(false)

// 打开弹窗
const openModal = () => {
  visible.value = true
}

// 关闭弹窗
const closeModal = () => {
  visible.value = false
}

// 暴露函数给父组件
defineExpose({
  openModal,
})
</script>

<style scoped>
.image-out-painting {
  text-align: center;
}
</style>由于 AI 扩图一定是对已有图片进行编辑,所以弹窗的属性可以不需要 spaceId。
2)开发弹窗的内容,采用一行两列栅格布局,左边显示原始图片、右边显示扩图结果,下方展示扩图操作按钮。
<a-row gutter="16">
  <a-col span="12">
    <h4>原始图片</h4>
    <img :src="picture?.url" :alt="picture?.name" style="max-width: 100%" />
  </a-col>
  <a-col span="12">
    <h4>扩图结果</h4>
    <img
      v-if="resultImageUrl"
      :src="resultImageUrl"
      :alt="picture?.name"
      style="max-width: 100%"
    />
  </a-col>
</a-row>
<div style="margin-bottom: 16px" />
<a-flex gap="16" justify="center">
  <a-button type="primary" ghost @click="createTask">生成图片</a-button>
  <a-button type="primary" @click="handleUpload">应用结果</a-button>
</a-flex>定义变量,用于存储图片结果:
▼typescript

复制代码const resultImageUrl = ref<string>()3)编写创建任务函数:
// 任务 id
let taskId = ref<string>()

/**
 * 创建任务
 */
const createTask = async () => {
  if (!props.picture?.id) {
    return
  }
  const res = await createPictureOutPaintingTaskUsingPost({
    pictureId: props.picture.id,
    // 可以根据需要设置扩图参数
    parameters: {
      xScale: 2,
      yScale: 2,
    },
  })
  if (res.data.code === 0 && res.data.data) {
    message.success('创建任务成功,请耐心等待,不要退出界面')
    console.log(res.data.data.output.taskId)
    taskId.value = res.data.data.output.taskId
    // 开启轮询
    startPolling()
  } else {
    message.error('创建任务失败,' + res.data.message)
  }
}任务创建成功后,要开启轮询。
4)编写轮询逻辑。注意无论任务执行成功或失败、还是退出当前页面时,都需要执行清理逻辑,包括:
- 清理定时器
- 将定时器变量设置为 null
- 将任务 id 设置为 null,这样允许前端多次执行任务
代码如下:
// 轮询定时器
let pollingTimer: NodeJS.Timeout = null

// 清理轮询定时器
const clearPolling = () => {
  if (pollingTimer) {
    clearInterval(pollingTimer)
    pollingTimer = null
    taskId.value = null
  }
}

// 开始轮询
const startPolling = () => {
  if (!taskId.value) return

  pollingTimer = setInterval(async () => {
    try {
      const res = await getPictureOutPaintingTaskUsingGet({
        taskId: taskId.value,
      })
      if (res.data.code === 0 && res.data.data) {
        const taskResult = res.data.data.output
        if (taskResult.taskStatus === 'SUCCEEDED') {
          message.success('扩图任务成功')
          resultImageUrl.value = taskResult.outputImageUrl
          clearPolling()
        } else if (taskResult.taskStatus === 'FAILED') {
          message.error('扩图任务失败')
          clearPolling()
        }
      }
    } catch (error) {
      console.error('轮询任务状态失败', error)
      message.error('检测任务状态失败,请稍后重试')
      clearPolling()
    }
  }, 3000) // 每隔 3 秒轮询一次
}

// 清理定时器,避免内存泄漏
onUnmounted(() => {
  clearPolling()
})5)当任务执行成功后,可以得到图片结果,此时就可以点击 “应用结果” 按钮,调用图片 URL 上传接口。这段代码可以直接复制已开发的 URL 图片上传组件,补充 loading 效果:
const uploadLoading = ref<boolean>(false)

const handleUpload = async () => {
  uploadLoading.value = true
  try {
    const params: API.PictureUploadRequest = {
      fileUrl: resultImageUrl.value,
      spaceId: props.spaceId,
    }
    if (props.picture) {
      params.id = props.picture.id
    }
    const res = await uploadPictureByUrlUsingPost(params)
    if (res.data.code === 0 && res.data.data) {
      message.success('图片上传成功')
      // 将上传成功的图片信息传递给父组件
      props.onSuccess?.(res.data.data)
      // 关闭弹窗
      closeModal()
    } else {
      message.error('图片上传失败,' + res.data.message)
    }
  } catch (error) {
    message.error('图片上传失败')
  } finally {
    uploadLoading.value = false
  }
}6)适当对页面做一些优化。
给生成图片按钮添加任务执行的 loading 效果,有任务 id 时,禁止按钮点击,可以防止重复提交任务。扩图结束后,会清理 taskId,就可以再次执行。
<a-button type="primary" :loading="!!taskId" ghost
  @click="createTask">
  生成图片
</a-button>2)添加应用结果(上传图片时)的 loading 效果:
<a-button type="primary" :loading="uploadLoading"
  @click="handleUpload">
  应用结果
</a-button>3)有图片结果时才显示 “应用结果” 按钮:
<a-button type="primary" v-if="resultImageUrl"
  :loading="uploadLoading"
  @click="handleUpload">
  应用结果
</a-button>2、创建图片页面引入弹窗
在创建图片页面使用组件,可以在编辑图片按钮右侧增加 “AI 扩图”,点击按钮后打开弹窗:
<a-space size="middle">
  <a-button :icon="h(EditOutlined)" @click="doEditPicture">编辑图片</a-button>
  <a-button type="primary" ghost :icon="h(FullscreenOutlined)" @click="doImagePainting">
    AI 扩图
  </a-button>
</a-space>
<ImageOutPainting
  ref="imageOutPaintingRef"
  :picture="picture"
  :spaceId="spaceId"
  :onSuccess="onImageOutPaintingSuccess"
/>编辑点击按钮后触发的函数,打开弹窗:
// AI 扩图弹窗引用
const imageOutPaintingRef = ref()

// AI 扩图
const doImagePainting = () => {
  if (imageOutPaintingRef.value) {
    imageOutPaintingRef.value.openModal()
  }
}

// 编辑成功事件
const onImageOutPaintingSuccess = (newPicture: API.PictureVO) => {
  picture.value = newPicture
}运行效果如图,感觉还是不错的吧~
扩展知识 - 异步任务优化
异步任务管理其实算是一类经典业务场景,有许多通用的优化方法可以提高系统效率和用户体验。
1)任务队列和优先级
使用消息队列系统(比如 RabbitMQ、Kafka)对异步任务进行管理,可以根据优先级灵活调度任务。通过队列还可以限制同时处理的任务数量、削峰填谷,防止资源过载,提高系统稳定性。
2)任务记录和状态管理
现在用户是无法找到往期执行的任务和生成的图片的。可以设计任务记录表,存储每个任务的状态、结果和相关信息,并提供接口供用户查询历史任务。
前端可以给用户提供往期任务查询页面,能够查看任务结果、重试某一次任务等。还可以给管理员提供监控系统所有任务的页面,比如任务数、成功率和失败率,全面掌握任务执行情况。
实现起来并不难,其实就是对任务记录表的增删改查。
3)任务错误信息优化
完善任务失败的具体原因,帮助用户快速理解和解决问题。比如参数错误、图片格式不支持等。如果调用了第三方接口,需要认真阅读接口所有可能的错误情况。
4)计费与额度控制
AI 扩图一般是计费业务,需要做好额度控制,并且仅登录用户才可以使用。
分享几个实现思路:
- 在用户表中添加“扩图额度”(比如使用次数或余额),每次提交任务前先检查额度是否足够,额度不足则提示用户充值。
- 每次任务提交时,可采用预扣费逻辑,任务完成扣费,任务失败则自动退还额度。
- 提供查询用户当前剩余额度的接口,用户可以在前端看到自己剩余的额度。
- 支持充值额度或会员订阅制收费,还可以根据扩图模式按比例扣费。比如普通模式扣 1 点,高清模式扣 2 点。
💡 一般对于后付费资源(随用随付费),即使余额 < 0,小额欠费也是可以接受的。尤其是对于大厂云服务来说,由于调用量巨大,很难做到实时计费。
5)安全性与稳定性
由于任务要消耗系统资源或成本,所以一定要设置合理的限流规则,防止恶意刷任务。比如限制单用户的任务提交频率,每分钟最多允许提交 3 次任务,超过限制后返回提示信息。
对于长耗时任务,还要设置任务的最大执行时间(比如 10 分钟),超时则自动标记任务失败。
鱼皮编程导航的 智能 BI 项目 和 面试鸭刷题平台项目 中都有讲解分布式限流相关的知识,可以按需学习。
此外,可以在任务执行前增加基础的校验,只对符合要求的图片创建任务,比如图片不能过大或过小:
扩展
1、尝试更多 AI 图片处理能力,比如 参考文档实现图配文
2、如果 AI 绘画 API 支持返回当前进度(比如 MidJourney 的 API),可以通过 SSE 的方式将进度返回给前端,鱼皮编程导航的 AI 答题应用平台项目 中有关于 SSE 的实战。
3、优化 AI 扩图参数。可以 参考官方文档,补充更多扩图参数,并允许用户自主选择扩图参数: